Quantcast
Channel: RGSS3 Scripts (RMVX Ace) Latest Topics
Viewing all 416 articles
Browse latest View live

Undefeated Hidden Enemies Visual Fix

$
0
0

Hello everybody,


I don't know if anyone else notices this - but it was bugging me right from the beginning, when I was playing around with battles, that have halfway appearing enemies.
 

Introduction

When you flee from a battle (Thanks to Mihel for pointing that out) before all halfway appearing enemies are summoned, there is a short moment just before the battle ends, when you will see the whole enemy party on the battle screen. This is now fixed.


How to use
Just paste the Script anywhere in the Materials section.


Screenshots & Demo

Unneccessary...


Compatibility issues?
There shouldn't be any. If you use any battle system apart from the default one or Yanfly's Battle Engine Ace, you should check the overwritten method just in case. 

The Script

#==============================================================================# # "Undefeated Hidden Enemies Visual Fix"# Version 1.1# Last Update: September 2nd, 2013# Author: DerTraveler (dertraveler [at] gmail.com)##==============================================================================## Description:## Fixes a small visual bug concerning hidden enemies that haven't appeared.# Without the fix these enemies would appear for a very short moment before the# battle ends, when the party flees from combat.##==============================================================================## How to use:# # Just paste it anywhere in the Materials section.##==============================================================================## Changelog:#   1.1:#     - Change the implementation of Game_Enemy only instead of Game_Battler#       and SceneManager, which were unneccessarily central changes.#       Thanks to Mihel & Tsukihime for pointing out that the bug only occurs#       when fleeing from battle and for hints regarding the cause of the#       problem.## Compatibility:## Overwrites  - Game_Enemy: on_battle_end##==============================================================================## Terms of use:## - Free to use in any commercial or non-commercial project.# - Please mail me if you find bugs so I can fix them.# - If you have feature requests, please also mail me, but I can't guarantee#   that I will add every requested feature.# - You don't need to credit me, if you don't want to for some reason, since#   it's only a bugfix of a standard RPG Maker behaviour.##==============================================================================class Game_Enemy < Game_Battler    # Identically to the implementation in Game_BattlerBase except of the removed  # call to 'appear' in the end, which is unneccessary since the data of  # defeated enemies aren't reused anywhere else.  def on_battle_end    @result.clear    remove_battle_states    remove_all_buffs    clear_actions    clear_tp unless preserve_tp?  end  end 


Brand New - Grand Menu

$
0
0

Hi, after a long time, I'm posting a new menu script. It's my second script.

This is menu script, with many customization.


This script require another script called "GUI Configuration".


That's all, plug and play.

If you want to change any adjustment just go through the script. I made it very simple.


Features:

1. Extra Windows:

Displays variables(2 variable display window - I used it as Game Progress(Var1) and Charisma(Var2), map name window, current party size, playtime, battle count and save count.


2. Icons: Each command will have an icon. Default commands already have their own. But if you added a new command then you have to do this simple thing :

Go to "GUI Config" script and go to line number 153. There are the command names.

Like this - "Items"         => 260,

You just have to add another line.

Suppose you are using Modern Algebras Quest Journal script and it will be automatically added to the menu. Then you have to add this line there - "Quests"         => 100,

(100 or whatever Icon you want to use)


3. Help Window: Each command items have their information in the help window.

Just like the icon section, you have to do a little adjustment here too.

Suppose yoou are using Quest Journal script, and the Quest command is automatically added to the menu, then.. all you have to do is go to script "Grand Menu" then go to line number 119, there you will see the help text module. You have to add there Quest help text. You just have put the help text in the right place.


4. Show only current HP and MP, I removed Max values.


5. Experience Bar. When some one is at level 99 it will show "Max"


6. Displaying character graphics instead of face.


Special thanks:

Nicke - I got the idea of the menu layout from Nicke's "Menu Delux"

Soulpour - Helped with the "Help Window".


Note: 

1. This menu is best for 640x480 resolution. If you use it in default 544x416 resolution windows will not be shown properly.

I made this in 640x480 for getting a bigger but compact view.

2. If you are using Black Morning's scripts you have to adjust the position of "Level" in the menu script.


If anyone finds any bug must reply here.


GUI Configuration:

#==============================================================================
# ** GUI Configuration
#------------------------------------------------------------------------------
#  This is a super class of all scenes within the game.
#==============================================================================
class Window_Base < Window
  #----------------------------------------------------------------------------
  # * Object Initialization
  #----------------------------------------------------------------------------
  def initialize(x, y, width, height)
    super
    self.windowskin = Cache.system("Window")
    self.back_opacity = 255
    self.opacity = 255
    update_padding
    update_tone
    create_contents
    @opening = @closing = false
  end
  #----------------------------------------------------------------------------
  # * Draw Gauge
  #     rate   : Rate (full at 1.0)
  #     color1 : Left side gradation
  #     color2 : Right side gradation
  #----------------------------------------------------------------------------
  def draw_gauge(x, y, width, rate, color1, color2)
    fill_w = (width * rate).to_i
    gauge_y = y + line_height - 8
    contents.fill_rect(x, gauge_y, width, 12, gauge_back_color)
    contents.gradient_fill_rect(x, gauge_y, fill_w, 12, color1, color2)
  end
  #----------------------------------------------------------------------------
  # * Draw Current Value in Fractional Format
  #     current : Current value
  #     color1  : Color of current value
  #     color2  : Color of maximum value
  #----------------------------------------------------------------------------
  def draw_current_value(x, y, width, current, color1, color2)
    change_color(color1)
    xr = x + width
    if width < 96
      draw_text(xr - 40, y, 42, line_height, current, 2)
    else
      draw_text(xr - 42, y + 6, 42, line_height, current, 2)
      change_color(color2)
    end
  end
  #----------------------------------------------------------------------------
  # * Draw HP
  #----------------------------------------------------------------------------
  def draw_actor_hp(actor, x, y, width = 160)
    draw_gauge(x, y, width, actor.hp_rate, hp_gauge_color1, hp_gauge_color2)
    change_color(system_color)
    draw_text(x + 2, y + 6, 30, line_height, Vocab::hp_a)
    draw_current_value(x, y, width, actor.hp, hp_color(actor), normal_color)
  end
  #----------------------------------------------------------------------------
  # * Draw MP
  #----------------------------------------------------------------------------
  def draw_actor_mp(actor, x, y, width = 160)
    draw_gauge(x, y, width, actor.mp_rate, mp_gauge_color1, mp_gauge_color2)
    change_color(system_color)
    draw_text(x + 2, y + 6, 30, line_height, Vocab::mp_a)
    draw_current_value(x, y, width, actor.mp, mp_color(actor), normal_color)
  end
  #----------------------------------------------------------------------------
  # * Draw Simple Status
  #----------------------------------------------------------------------------
  def draw_actor_simple_status(actor, x, y)
    draw_actor_name(actor, x, y)
    draw_actor_level(actor, x, y + line_height * 1)
    draw_actor_icons(actor, x, y + line_height * 2)
    draw_actor_class(actor, x + 120, y)
    draw_actor_hp(actor, x + 120, y + line_height * 1)
    draw_actor_mp(actor, x + 120, y + line_height * 2)
  end
  #----------------------------------------------------------------------------
  # * Draw Level
  #----------------------------------------------------------------------------
  def draw_actor_level(actor, x, y)
    change_color(system_color)
    draw_text(x, y, 32, line_height, "Lv.")
    change_color(normal_color)
    draw_text(x + 20, y, 24, line_height, actor.level, 0)
  end
  #--------------------------------------------------------------------------
  # * Draw State and Buff/Debuff Icons
  #--------------------------------------------------------------------------
  def draw_actor_icons(actor, x, y, width = 96)
    icons = (actor.state_icons + actor.buff_icons)[0, width / 24]
    icons.each_with_index {|n, i| draw_icon(n, x + 24 * i, y) }
  end
  #============================================================================
  # ** Experience Gauge
  #----------------------------------------------------------------------------
  # * Get Text Colors
  #----------------------------------------------------------------------------
  def exp_gauge_color1;      text_color(11);  end;  # EXP gauge added lower half
  def exp_gauge_color2;      text_color(3);   end;  # EXP gauge added upper half
  def exp_gauge_back_color;  text_color(19);  end;  # EXP Gauge background
  #----------------------------------------------------------------------------
  # * Draw exp Gauge
  #     rate   : Rate (full at 1.0)
  #     color1 : Left side gradation
  #     color2 : Right side gradation
  #----------------------------------------------------------------------------
  def draw_expgauge(x, y, width, rate, color1, color2)
    fill_w = (width * rate).to_i
    gauge_y = y + line_height - 8
    contents.fill_rect(x, gauge_y, width, 12, exp_gauge_back_color)
    contents.gradient_fill_rect(x, gauge_y, fill_w, 12, color1, color2)
  end
  #----------------------------------------------------------------------------
  # * Draw EXP  This is the exp info to be drawn on the "menu" status
  #----------------------------------------------------------------------------
  def draw_exp(actor, x, y, width = 160)
        s1 = actor.max_level? ? "Max" : actor.exp
        s2 = actor.max_level? ? "0" : actor.next_level_exp - actor.exp
        if actor.max_level? ?
          draw_expgauge(x, y, width, 1, exp_gauge_color1, exp_gauge_color2) :
          draw_gauge(x, y,width,((((actor.exp - actor.current_level_exp).to_f/100) / ((actor.next_level_exp.to_f - actor.current_level_exp.to_f)/100))),  
          exp_gauge_color1, exp_gauge_color2)
        end
        change_color(system_color)
        draw_text(x + 2, y + 6, 30, line_height, "XP")
        change_color(normal_color)
        if actor.max_level? ?
          draw_text(x + width - 72, y + 6, 72, line_height, "Max", 2) :
          draw_text(x + width - 72, y + 6, 72, line_height, actor.next_level_exp.to_i - actor.exp.to_i, 2)
        end
      end
    end
  #----------------------------------------------------------------------------
  # * Font Configuration
  #----------------------------------------------------------------------------
  Font.default_name      = ["Roboto Condensed"]   
  Font.default_size      = 20
  Font.default_bold      = false
  Font.default_italic    = false
  Font.default_shadow    = false
  Font.default_outline   = true
  Font.default_color     = Color.new(255,255,255,255)
  Font.default_out_color = Color.new(0,0,0,182)
  #----------------------------------------------------------------------------
  # * Graphics Resolution
  #----------------------------------------------------------------------------
  Graphics.resize_screen(640, 480) 
#==============================================================================
# ** Command Icon
#------------------------------------------------------------------------------
#  This is a super class of all scenes within the game.
#==============================================================================
module Command_Icons
    #--------------------------------------------------------------------------
    # * Icon ID
    #--------------------------------------------------------------------------
    ICON_ID ={
    # Command Name    => Icon ID,
      "Items"         => 260,    
      "Skills"        => 143,    
      "Equipment"     => 436,    
      "Status"        => 121,
      "Formation"     =>  12,    
      "Save"          => 286,    
      "Game End"      => 368,
    } 
    end
#==============================================================================
# ** Window_Command
#==============================================================================
class Window_MenuCommand < Window_Command
  #--------------------------------------------------------------------------
  # Use Icon
  #--------------------------------------------------------------------------
  def use_icon?(text)
    return Command_Icons::ICON_ID.include?(text)
  end
  #--------------------------------------------------------------------------
  # Command Icon
  #--------------------------------------------------------------------------
  def command_icon(text)
    return Command_Icons::ICON_ID[text]
  end
  #--------------------------------------------------------------------------
  # Draw Item
  #--------------------------------------------------------------------------
  def draw_item(index)
    enabled = command_enabled?(index)
    change_color(normal_color, enabled)
    rect = item_rect_for_text(index)
    text = command_name(index)
    if use_icon?(text)
      draw_icon_text(rect.clone, text, alignment, enabled)
    else
      draw_text(rect, text, alignment)
    end
  end
  #--------------------------------------------------------------------------
  # Draw Text
  #--------------------------------------------------------------------------
  def draw_icon_text(rect, text, alignment, enabled)
    cw = text_size(text).width
    icon = command_icon(text)
    draw_icon(icon, rect.x, rect.y, enabled)
    rect.x += 28
    rect.width -= 24
    draw_text(rect, text, alignment)
  end
end 


#==============================================================================
# ** Grand Menu
# Version: 1.0 [Initial]
#------------------------------------------------------------------------------
# Auther - Rupam Ontherocks
#------------------------------------------------------------------------------
# Require: GUI Configuration
#------------------------------------------------------------------------------
# Description:
# This is a brand new model of main menu, nothing else.
#------------------------------------------------------------------------------
 
#==============================================================================
# ** Scene_Menu
#------------------------------------------------------------------------------
#  Main menu process.
#==============================================================================
class Scene_Menu < Scene_MenuBase
  alias grand_menu_engine start
  #--------------------------------------------------------------------------
  # * Start Processing
  #--------------------------------------------------------------------------
  def start
    grand_menu_engine
    create_help_window
    create_menu_command_window
    create_gold_window
    create_location_window
    create_status_window
    create_progress_window
    create_charisma_window
    create_party_window
    create_battle_window
    create_save_window
    create_play_time_window
  end
  
  def create_help_window
    @command_help_window = Window_HelpCommand.new
    @command_help_window.y = 0
  end
  
  def update
    super
    @command_help_window.set_helpText(@command_window.index) if @command_window 
  end
  
  def create_menu_command_window
    @command_window = Window_MenuCommand.new
    @command_window.set_handler(:item,      method(:command_item))
    @command_window.set_handler(:skill,     method(:command_personal))
    @command_window.set_handler(:equip,     method(:command_personal))
    @command_window.set_handler(:status,    method(:command_personal))
    @command_window.set_handler(:formation, method(:command_formation))
    @command_window.set_handler(:save,      method(:command_save))
    @command_window.set_handler(:game_end,  method(:command_game_end))
    @command_window.set_handler(:cancel,    method(:return_scene))
    @command_window.y = 48
  end
  
  def create_gold_window
    @gold_window = Window_Gold.new
    @gold_window.y = Graphics.height - 72
  end
  
  def create_location_window
    @location_window = Window_Location.new(0, 0)
    @location_window.x = 160
    @location_window.y = Graphics.height - 144
  end
  
  def create_status_window
    @status_window = Window_MenuStatus.new(0, 0)
    @status_window.x = Graphics.width / 2
    @status_window.y = 0
  end
  
  def create_progress_window
    @progress_window = Window_Progress.new(0, 0)
    @progress_window.x = 0
    @progress_window.y = 48
  end
  
  def create_charisma_window
    @charisma_window = Window_Charisma.new(0, 0)
    @charisma_window.x = 0
    @charisma_window.y = 120
  end
  
  def create_party_window
    @party_window = Window_Party.new(0, 0)
    @party_window.x = 0
    @party_window.y = 192
  end
  
  def create_battle_window
    @battle_window = Window_BattleCount.new(0, 0)
    @battle_window.x = 0
    @battle_window.y = 264
  end
  
  def create_save_window
    @save_window = Window_SaveCount.new(0, 0)
    @save_window.x = 0
    @save_window.y = 336
  end
  
  def create_play_time_window
    @play_time_window = Window_PlayTime.new(0, 0)
    @play_time_window.x = 0
    @play_time_window.y = 408
  end
end
#==============================================================================
# ** Window_HelpCommand
#------------------------------------------------------------------------------
#  This is a super class of all scenes within the game.
#==============================================================================
module Command
  # this is the array of the index of the commands, so when you
  # change the command index, you change the help window text
  Command_HelpText = [
    # Item
    "Browse through items, gears and accessories.",
    # Skills
    "Check special abilities of team members.",
    # Equip
    "Equip gears and accessories.",
    # Status
    "View full statistics of a character.",
    # Formation
    "Change formation of team members.",
    # Save
    "Record current game progress.",
    # Game End
    "Stop playing and go study.",
    ]
end
 
 
class Window_HelpCommand < Window_Base
  #--------------------------------------------------------------------------
  # * Object Initialization
  #--------------------------------------------------------------------------
  def initialize(line_number = 1)
    super(0, 0, Graphics.width / 2, fitting_height(line_number))
  end
  #--------------------------------------------------------------------------
  # * Refresh
  #--------------------------------------------------------------------------
  def refresh
    contents.clear
  end
  
  def set_helpText(index)
    refresh # refresh the content so the window will not overlap
    draw_text_ex(4, 0, Command::Command_HelpText[index])
  end
end
#==============================================================================
# ** Window_MenuCommand
#------------------------------------------------------------------------------
#  This command window appears on the menu screen.
#==============================================================================
 
class Window_MenuCommand < Window_Command
  #--------------------------------------------------------------------------
  # * Initialize Command Selection Position (Class Method)
  #--------------------------------------------------------------------------
  def self.init_command_position
    @@last_command_symbol = nil
  end
  #--------------------------------------------------------------------------
  # * Object Initialization
  #--------------------------------------------------------------------------
  def initialize
    super(160, 0)
    select_last
  end
  #--------------------------------------------------------------------------
  # * Get Window Width
  #--------------------------------------------------------------------------
  def window_width
    return 160
  end
  #--------------------------------------------------------------------------
  # * Get Number of Lines to Show
  #--------------------------------------------------------------------------
  def visible_line_number
    11
  end
  #--------------------------------------------------------------------------
  # * Create Command List
  #--------------------------------------------------------------------------
  def make_command_list
    add_main_commands
    add_formation_command
    add_original_commands
    add_save_command
    add_game_end_command
  end
  #--------------------------------------------------------------------------
  # * Add Main Commands to List
  #--------------------------------------------------------------------------
  def add_main_commands
    add_command(Vocab::item,   :item,   main_commands_enabled)
    add_command(Vocab::skill,  :skill,  main_commands_enabled)
    add_command(Vocab::equip,  :equip,  main_commands_enabled)
    add_command(Vocab::status, :status, main_commands_enabled)
  end
  #--------------------------------------------------------------------------
  # * Add Formation to Command List
  #--------------------------------------------------------------------------
  def add_formation_command
    add_command(Vocab::formation, :formation, formation_enabled)
  end
  #--------------------------------------------------------------------------
  # * For Adding Original Commands
  #--------------------------------------------------------------------------
  def add_original_commands
  end
  #--------------------------------------------------------------------------
  # * Add Save to Command List
  #--------------------------------------------------------------------------
  def add_save_command
    add_command(Vocab::save, :save, save_enabled)
  end
  #--------------------------------------------------------------------------
  # * Add Exit Game to Command List
  #--------------------------------------------------------------------------
  def add_game_end_command
    add_command(Vocab::game_end, :game_end)
  end
  #--------------------------------------------------------------------------
  # * Get Activation State of Main Commands
  #--------------------------------------------------------------------------
  def main_commands_enabled
    $game_party.exists
  end
  #--------------------------------------------------------------------------
  # * Get Activation State of Formation
  #--------------------------------------------------------------------------
  def formation_enabled
    $game_party.members.size >= 2 && !$game_system.formation_disabled
  end
  #--------------------------------------------------------------------------
  # * Get Activation State of Save
  #--------------------------------------------------------------------------
  def save_enabled
    !$game_system.save_disabled
  end
  #--------------------------------------------------------------------------
  # * Processing When OK Button Is Pressed
  #--------------------------------------------------------------------------
  def process_ok
    @@last_command_symbol = current_symbol
    super
  end
  #--------------------------------------------------------------------------
  # * Restore Previous Selection Position
  #--------------------------------------------------------------------------
  def select_last
    select_symbol(@@last_command_symbol)
  end
  #--------------------------------------------------------------------------
  # * Command Underline
  #--------------------------------------------------------------------------
  def item_rect_for_text(index)
    rect = item_rect(index)
    contents.fill_rect(rect.x + 28, rect.y + 19, 105, 2,  normal_color)
    rect
    end
end
#==============================================================================
# ** Window_Location
#------------------------------------------------------------------------------
#  This window displays the current map name.
#==============================================================================
class Window_Location < Window_Base
  def initialize(x, y)
        super(x, y, 160, 72)
        refresh
      end      
#------------------------------------------------------------------------------
# - Refresh                                                                 
#------------------------------------------------------------------------------
  def refresh
        self.contents.clear
         @actor = $game_party.members[0]
         change_color(hp_gauge_color1)
         draw_text(28, 0, 160, line_height, "Location:")
         change_color(system_color)
         contents.font.size = 18
         draw_text(0, 24, width, line_height, "#{$data_mapinfos[$game_map.map_id].name}")
         contents.font.size = 20
         draw_icon(231, 0, 0, true)
        end
      end
#==============================================================================
# ** Window_Gold
#------------------------------------------------------------------------------
#  This window displays the party's gold.
#==============================================================================
class Window_Gold < Window_Base
  #--------------------------------------------------------------------------
  # * Object Initialization
  #--------------------------------------------------------------------------
  def initialize
    super(160, 0, window_width, fitting_height(2))
    refresh
  end
  #--------------------------------------------------------------------------
  # * Get Window Width
  #--------------------------------------------------------------------------
  def window_width
    return 160
  end
  #--------------------------------------------------------------------------
  # * Refresh
  #--------------------------------------------------------------------------
  def refresh
    contents.clear
    change_color(system_color)
    draw_text(26, 0, width, line_height, "Coin:")
    change_color(normal_color)
    draw_currency_value(value, currency_unit, 8, 24, contents.width - 8)
  end
  #--------------------------------------------------------------------------
  # * Get Party Gold
  #--------------------------------------------------------------------------
  def value
    $game_party.gold
  end
  #--------------------------------------------------------------------------
  # Get Currency Unit
  #--------------------------------------------------------------------------
  def currency_unit
    draw_icon(361, 0, 0, true)
    end
  #--------------------------------------------------------------------------
  # * Open Window
  #--------------------------------------------------------------------------
  def open
    refresh
    super
  end
end
#==============================================================================
# ** Window_MenuStatus
#------------------------------------------------------------------------------
#  This window displays party member status on the menu screen.
#==============================================================================
 
class Window_MenuStatus < Window_Selectable
  #--------------------------------------------------------------------------
  # * Public Instance Variables
  #--------------------------------------------------------------------------
  attr_reader   :pending_index            # Pending position (for formation)
  #--------------------------------------------------------------------------
  # * Object Initialization
  #--------------------------------------------------------------------------
  def initialize(x, y)
    super(x, y, window_width, window_height)
    @pending_index = -1
    refresh
  end
  #--------------------------------------------------------------------------
  # * Get Window Width
  #--------------------------------------------------------------------------
  def window_width
    Graphics.width - 320
  end
  #--------------------------------------------------------------------------
  # * Get Window Height
  #--------------------------------------------------------------------------
  def window_height
    Graphics.height
  end
  #--------------------------------------------------------------------------
  # * Get Number of Items
  #--------------------------------------------------------------------------
  def item_max
    $game_party.members.size
  end
  #--------------------------------------------------------------------------
  # * Get Item Height
  #--------------------------------------------------------------------------
  def item_height
    (height - standard_padding * 2) / 4
  end
  #--------------------------------------------------------------------------
  # * Draw Item
  #--------------------------------------------------------------------------
  def draw_item(index)
    actor = $game_party.members[index]
    enabled = $game_party.battle_members.include?(actor)
    rect = item_rect(index)
    draw_item_background(index)
    contents.fill_rect(rect.x + 5, rect.y + 5, 286, 104,  Font.default_out_color)
    # Name
    draw_actor_name(actor, rect.x + 8, rect.y + 4)
    contents.font.size = 18
    # Class
    draw_actor_class(actor, rect.x + 18, rect.y + 24)
    # Level
    draw_actor_level(actor, rect.x + 18, rect.y + 40)
    # EXP
    draw_exp(actor, rect.x + 122, rect.y - 2)
    # HP
    draw_actor_hp(actor, rect.x + 122, rect.y + 17)
    # MP
    draw_actor_mp(actor, rect.x + 122, rect.y + 36)
    # States Icon
    draw_actor_icons(actor, rect.x + 121, rect.y + 70)
    contents.font.size = 20
    # Charset
    draw_actor_graphic(actor, rect.x + 30, rect.y + 104)
  end
  #--------------------------------------------------------------------------
  # * Draw Background for Item
  #--------------------------------------------------------------------------
  def draw_item_background(index)
    if index == @pending_index
      contents.fill_rect(item_rect(index), pending_color)
    end
  end
  #--------------------------------------------------------------------------
  # * Processing When OK Button Is Pressed
  #--------------------------------------------------------------------------
  def process_ok
    super
    $game_party.menu_actor = $game_party.members[index]
  end
  #--------------------------------------------------------------------------
  # * Restore Previous Selection Position
  #--------------------------------------------------------------------------
  def select_last
    select($game_party.menu_actor.index || 0)
  end
  #--------------------------------------------------------------------------
  # * Set Pending Position (for Formation)
  #--------------------------------------------------------------------------
  def pending_index=(index)
    last_pending_index = @pending_index
    @pending_index = index
    redraw_item(@pending_index)
    redraw_item(last_pending_index)
  end
end
#==============================================================================
# ** Window_Progress
#------------------------------------------------------------------------------
#  This window displays Variable 1.
#==============================================================================
class Window_Progress < Window_Base
  def initialize(x, y)
        super(x, y, 160, 72)
        refresh
      end      
#------------------------------------------------------------------------------
# - Refresh                                                                 
#------------------------------------------------------------------------------
  def refresh
        self.contents.clear
         @actor = $game_party.members[0]
         contents.font.size = 18
         change_color(hp_gauge_color1)
         draw_icon(189, 0, 0, true)
         draw_text(28, 0, 250, line_height, "Game Progress:")
         change_color(normal_color)
         draw_text(0,24, 250, line_height, "#{$game_variables[1]}%", 0)
       end
     end
#==============================================================================
# ** Window_Charisma
#------------------------------------------------------------------------------
#  This window displays Variable 2.
#==============================================================================
class Window_Charisma < Window_Base
  def initialize(x, y)
        super(x, y, 160, 72)
        refresh
      end      
#------------------------------------------------------------------------------
# - Refresh                                                                 
#------------------------------------------------------------------------------
  def refresh
        self.contents.clear
         @actor = $game_party.members[0]
         contents.font.size = 18
         change_color(hp_gauge_color2)
         draw_icon(189, 0, 0, true)
         draw_text(28, 0, 250, line_height, "Charisma Status:")
         change_color(normal_color)
         draw_text(0,24, 250, line_height, "#{$game_variables[1]}", 0)
       end
     end
#==============================================================================
# ** Window_Party
#------------------------------------------------------------------------------
#  This window displays number of party members.
#==============================================================================
class Window_Party < Window_Base
  def initialize(x, y)
        super(x, y, 160, 72)
        refresh
      end      
#------------------------------------------------------------------------------
# - Refresh                                                                 
#------------------------------------------------------------------------------
  def refresh
        self.contents.clear
         @actor = $game_party.members[0]
         contents.font.size = 18
         change_color(tp_gauge_color2)
         draw_icon(189, 0, 0, true)
         draw_text(28, 0, 250, line_height, "Team Members:")
         change_color(normal_color)
         draw_text(0,24, 250, line_height, "#{$game_party.all_members.size}", 0)
       end
     end
#==============================================================================
# ** Window_BattleCount
#------------------------------------------------------------------------------
#  This window displays number of battle encounter.
#==============================================================================
class Window_BattleCount < Window_Base
  def initialize(x, y)
        super(x, y, 160, 72)
        refresh
      end      
#------------------------------------------------------------------------------
# - Refresh                                                                 
#------------------------------------------------------------------------------
  def refresh
        self.contents.clear
         @actor = $game_party.members[0]
         contents.font.size = 18
         change_color(mp_gauge_color2)
         draw_icon(189, 0, 0, true)
         draw_text(28, 0, 250, line_height, "Battles Won:")
         change_color(normal_color)
         draw_text(0,24, 250, line_height, "#{$game_system.battle_count}", 0)
       end
     end
#==============================================================================
# ** Window_Save
#------------------------------------------------------------------------------
#  This window displays number of saves.
#==============================================================================
class Window_SaveCount < Window_Base
  def initialize(x, y)
        super(x, y, 160, 72)
        refresh
      end      
#------------------------------------------------------------------------------
# - Refresh                                                                 
#------------------------------------------------------------------------------
  def refresh
        self.contents.clear
         @actor = $game_party.members[0]
         contents.font.size = 18
         change_color(crisis_color)
         draw_icon(189, 0, 0, true)
         draw_text(28, 0, 250, line_height, "Save Count:")
         change_color(normal_color)
         draw_text(0,24, 250, line_height, "#{$game_system.save_count}", 0)
       end
     end
#==============================================================================
# ** Window_PlayTime
#------------------------------------------------------------------------------
#  This window displays number of saves.
#==============================================================================
class Window_PlayTime < Window_Base
  def initialize(x, y)
        super(x, y, 160, 72)
        refresh
      end      
#------------------------------------------------------------------------------
# - Refresh                                                                 
#------------------------------------------------------------------------------
  def refresh
        self.contents.clear
         @actor = $game_party.members[0]
         contents.font.size = 18
         change_color(mp_cost_color)
         draw_icon(189, 0, 0, true)
         draw_text(28, 0, 250, line_height, "Play Time:")
         change_color(normal_color)
         draw_text(0,24, 250, line_height, "#{$game_system.playtime_s}", 0)
       end
       
       def update
         super
         @playtime = $game_system.playtime_s
         refresh
       end
      end 

Grand Menu.pngGrand Menu2.pngGrand Menu3.png

YES - Skill Equip Add-on: Passive States

$
0
0

Overview

This is an add-on for Yami Engine Symphony - Skill Equip script that allows you to make equipped skills add a state to the user. So basically, it's like giving the ability to have equipped passive states. Done per request of Oriceles

Script

#==============================================================================# # ¥ Yami Engine Symphony - Skill Equip: States# -- Last Updated: 2015.07.18# -- Level: Easy# -- Requires: YES - Skill Equip# -- Author: Adiktuzmiko# -- Requested by: Oriceles# -- Documentation by: Oriceles##==============================================================================#==============================================================================# ¥ Updates# =-=-=-=-=-=-=-=-=-=-=-=-=-=-=-=-=-=-=-=-=-=-=-=-=-=-=-=-=-=-=-=-=-=-=-=-=-=-=# 2014.04.10 - Finished Script.# 2014.04.10 - Started Script.##==============================================================================#==============================================================================# ¥ Introduction# =-=-=-=-=-=-=-=-=-=-=-=-=-=-=-=-=-=-=-=-=-=-=-=-=-=-=-=-=-=-=-=-=-=-=-=-=-=-=# This script is an add-on for YES - Skill Equip, allows user to bind states to# skills, which will be added to the actor whenever it equips the skill.##==============================================================================# ¥ Instructions# =-=-=-=-=-=-=-=-=-=-=-=-=-=-=-=-=-=-=-=-=-=-=-=-=-=-=-=-=-=-=-=-=-=-=-=-=-=-=# To install this script, open up your script editor and copy/paste this script# to an open slot below ¥ Materials/‘fÞ but above ¥ Main. Remember to save.##==============================================================================# ¥ Known Issues# =-=-=-=-=-=-=-=-=-=-=-=-=-=-=-=-=-=-=-=-=-=-=-=-=-=-=-=-=-=-=-=-=-=-=-=-=-=-=# If one of the starting actors in new game has learned by default a skill# binded to a state the game will crash with a StackTooDeep Error. To avoid# this issue just don't add any skill binded to a state by default make them# learn them later in the game.# #==============================================================================# ¥ Compatibility# =-=-=-=-=-=-=-=-=-=-=-=-=-=-=-=-=-=-=-=-=-=-=-=-=-=-=-=-=-=-=-=-=-=-=-=-=-=-=# This script is made strictly for RPG Maker VX Ace. It is highly unlikely that# it will run with RPG Maker VX without adjustments.# #============================================================================== #==============================================================================# ¡ Configuration#============================================================================== module ADIK  module EQUIP_SKILL_STATES        #Skill ID => State ID,    #===========================================================================    # - Skill/State biding Settings -    #=-=-=-=-=-=-=-=-=-=-=-=-=-=-=-=-=-=-=-=-=-=-=-=-=-=-=-=-=-=-=-=-=-=-=-=-=-    # The following list will bind the skills to states.    # Means that if skill 5 is equipped, state 4 will be added.    #===========================================================================    LIST = { #  Start       #Skill   #State    127  =>   30,            } #  End  endend #==============================================================================# ¥ Editting anything past this point may potentially result in causing# computer damage, incontinence, explosion of user's head, coma, death, and/or# halitosis so edit at your own risk.#============================================================================== class Game_Actor    attr_accessor :passive_states_adik    alias equip_skill_states_adik equip_skill  def equip_skill(index,id)    equip_skill_states_adik(index,id)    refresh_passive_states_adik  end  #~   alias state_addable_adik_equip_skill? state_addable?#~   def state_addable?(state_id)#~     @forced = false if @forced.nil?#~     if @forced#~       state_addable_adik_equip_skill?(state_id)#~     else#~       return alive?#~     end#~   end    def refresh_passive_states_adik    return if @equip_skills.nil?    @passive_states_adik = [] if @passive_states_adik.nil?    @passive_states_adik.each do |id|      self.erase_state(id)      @passive_states_adik.delete(id)    end    @result.clear    @equip_skills.each do |sk|      next if sk == 0      if ADIK::EQUIP_SKILL_STATES::LIST.keys.include?(sk)        id=ADIK::EQUIP_SKILL_STATES::LIST[sk]        @forced = true        self.add_state(id)        @forced = false        @passive_states_adik.push(id)      end    end  end    alias clear_states_states_adik clear_states  def clear_states    clear_states_states_adik    refresh_passive_states_adik  end end #==============================================================================# # ¥ End of File# #==============================================================================

Terms of use

Will follow the terms of the original script

Simple Bust Message System

$
0
0

Just A Simple Bust System~

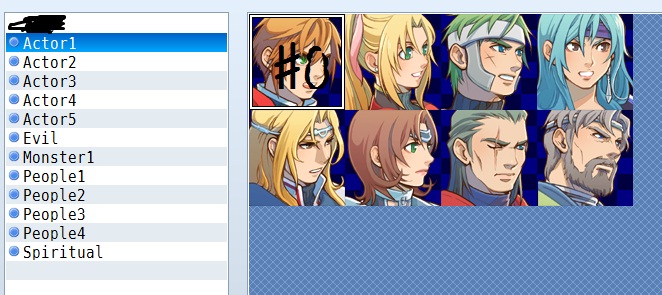
screenshot.png


Before The Script

So hi everyone~ Sorry for my bad English again=-=... This is my first sciprt and this script makes you have a simple bust message system.


Script

See it here: http://lbq.mist.so/rgss/bust-message-system


How to use it?

method0.jpg

 If you want to make the face of Ralph automatically switched by the bust of Ralph. First, find the face_name and face_index of Ralph, which are Actor1 and 0.


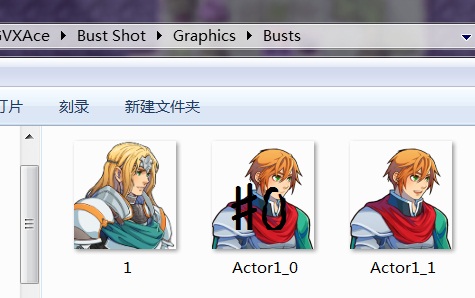
method1.jpg

then put the bust in Graphics/Busts folder as Actor1_0, then it will be automatically substituted by the bust.


Terms of Use

 Just credit me and you can do whatever you like with this script =w=


This scipt contains some additional features which might be useful, but I do not consider that as part of this script.

Hudell Character Effects

$
0
0

Hudell Character Effects


https://github.com/Hudell/scripts/blob/master/standalone/character_effects/character_effects.rb


This simple script will let you show some effects on the player or on an event.


There are currently 3 main effects available: shaking, rotating and flashing.


Shaking:

$game_player.shake

You can pass three different parameters to it: offset_x, offset_y and frames.

offset_x determines how much the character will move horizontally when shaking (Default is 0.3, equivalent to roughly to 10px)

offset_y determines how much the character will move vertically when shaking (Default is 0.3)

frames determine how long the character will shake. (Default is 30 frames)


Flashing:

$game_player.flash(10)or$game_player.flash_loop(10, 6)

The first script call above will flash the player for 10 frames. The second will do the same thing 6 times.

You can pass additional parameters to change the alpha or the color of the flash, in this order: alpha, red, green, blue. The default is 255 to all of them.


Rotating:

$game_player.rotate(360, 60)

This script call will rotate the player 360 degrees and it will take 60 frames to complete the rotation.

You can change the center of the rotation with those two script calls:

$game_player.origin_x = 20$game_player.origin_y = 10

The default origin values are 0, set it to a larger value to move the rotation center right/down, or set it to a larger value to move it left/up.

If you change the origin, be careful, as the player/event won't trigger collision or other events if any of the origin values is not zero.


As usual, you're free to use this script on any kind of project you want.

State Animations

$
0
0

This script provides some state-related animation effects. You can have custom animations play before a state is added, or before a state is removed.
 
If you want to have state animations playing while the state is applied, you can use Yanfly's State Animations

trans.gifDownload

Get it at Hime Works!

Installation

Place this script below Materials and above Main

Usage

Note-tag states with

<add anim: ID><remove anim: ID>

Where ID is the ID of the animation that you want to play.

Sixth's Mini-Games - v1.2 (13/12/2015)

$
0
0

- Sixth's Mini-Games

- Intro:

I have been making mini-games for RPG Maker VX Ace for a while now, but never bothered to clean my code for them, let alone publishing them.

But I decided to share these scripts now.

When I finish with the code clean up for my other mini-games, I will add them too.

Note that all of my mini-games require at least 2 of my other scripts. Those are:

- Mini-Game Base

- Picture Number Drawing

These are included in the demo.

Currently, there are 3 mini-games in the demo below, and these are:


- "Stay In Range" Mini-Game:

Spoiler

#===============================================================================
# * [ACE] "Stay-In-Range" Mini-Game
#===============================================================================
# * Made by: Sixth (www.rpgmakervxace.net, www.forums.rpgmakerweb.com)
# * Version: 1.1
# * Updated: 08/12/2015
# * Requires: Sixth's Picture Number Drawing
#             Sixth's Mini-Game Base
#-------------------------------------------------------------------------------
# * < Change Log >
#-------------------------------------------------------------------------------
# * Version 1.0 (29/11/2015)
#   - Initial release.
# * Version 1.1 (08/12/2015)
#   - Re-worked the code. This script now requires my Mini-Game Base script too!
#   - Changed the script calls. All of them are explained in the Mini-Game Base
#     script (except the mini-game starting script call)!
#   - Added popups to show the player when the game starts/ends.
#-------------------------------------------------------------------------------
# * < Description >
#-------------------------------------------------------------------------------
# * This is mini-game script, where the player needs to keep a cursor in the
#   range of a moving and shrinking bar.
# * The player can earn scores from winning in the game too. You can use these
#   scores in eventing.# * Settings for making infinite difficulties.
# * Completely image based! The images used can be changed during the game too!
# * For scripters: Easily implement this mini-game into any scenes!
#   All you have to do is to create a mini game instance and loop it's update 
#   method (along with the Input and Graphics update methods) until the game 
#   is finished. 
#------------------------------------------------------------------------------- 
# * < Instructions >
#-------------------------------------------------------------------------------
# * Refer to the script's header for usage information!
#------------------------------------------------------------------------------- 
# * < Installation >
#-------------------------------------------------------------------------------
# * Place this script below Materials but above Main!
#-------------------------------------------------------------------------------
# * < Compatibility Info >
#-------------------------------------------------------------------------------
# * No known incompatibilities.
#-------------------------------------------------------------------------------
# * < Known Issues >
#-------------------------------------------------------------------------------
# * No known issues.
#-------------------------------------------------------------------------------
# * < Terms of Use >
#-------------------------------------------------------------------------------
# * Free to use for whatever purposes you want.
# * Credit me (Sixth) in your game, pretty please! 
# * Posting modified versions of this script is allowed as long as you notice me
#   about it with a link to it!
#===============================================================================


- QTE (Type 1) Mini-Game:

Spoiler

#===============================================================================
# * [ACE] QTE (Type 1) Mini-Game
#===============================================================================
# * Made by: Sixth (www.rpgmakervxace.net, www.forums.rpgmakerweb.com)
# * Version: 1.1
# * Updated: 13/12/2015
# * Requires: Sixth's Picture Number Drawing
#             Sixth's Mini-Game Base
#-------------------------------------------------------------------------------
# * < Change Log >
#-------------------------------------------------------------------------------
# * Version 1.0 (08/12/2015)
#   - Initial release.
# * Version 1.1 (13/12/2015)
#   - Fixed a typo which resulted in reading the BGM change settings from the
#     "Stay-In-Range" mini-game instead of this one.
#-------------------------------------------------------------------------------
# * < Description >
#-------------------------------------------------------------------------------
# * This is a mini-game script, where the player needs to press buttons at the
#   right time. So, it's a timing mini-game, can be called a "quick time event"
#   (QTE) mini-game as well.
# * The player can earn scores from winning in the game too. You can use these
#   scores in eventing.
# * Settings for making infinite difficulties.
# * Completely image based! The images used can be changed during the game too!
# * For scripters: Easily implement this mini-game into any scenes!
#   All you have to do is to create a mini game instance and loop it's update 
#   method (along with the Input and Graphics update methods) until the game 
#   is finished. 
#------------------------------------------------------------------------------- 
# * < Instructions >
#-------------------------------------------------------------------------------
# * Refer to the script's header for usage information!
#------------------------------------------------------------------------------- 
# * < Installation >
#-------------------------------------------------------------------------------
# * Place this script below Materials but above Main!
#-------------------------------------------------------------------------------
# * < Compatibility Info >
#-------------------------------------------------------------------------------
# * No known incompatibilities.
#-------------------------------------------------------------------------------
# * < Known Issues >
#-------------------------------------------------------------------------------
# * No known issues.
#-------------------------------------------------------------------------------
# * < Terms of Use >
#-------------------------------------------------------------------------------
# * Free to use for whatever purposes you want.
# * Credit me (Sixth) in your game, pretty please! 
# * Posting modified versions of this script is allowed as long as you notice me
#   about it with a link to it!
#===============================================================================


- QTE (Type 2) Mini-Game:

Spoiler

#===============================================================================
# * [ACE] QTE (Type 2) Mini-Game
#===============================================================================
# * Made by: Sixth (www.rpgmakervxace.net, www.forums.rpgmakerweb.com)
# * Version: 1.0
# * Updated: 13/12/2015
# * Requires: Sixth's Picture Number Drawing
#             Sixth's Mini-Game Base
#-------------------------------------------------------------------------------
# * < Change Log >
#-------------------------------------------------------------------------------
# * Version 1.0 (13/12/2015)
#   - Initial release.
#-------------------------------------------------------------------------------
# * < Description >
#-------------------------------------------------------------------------------
# * This is a mini-game script, where the player needs to press buttons at the
#   right time. So, it's a timing mini-game, can be called a "quick time event"
#   (QTE) mini-game as well.
# * The player can earn scores from winning in the game too. You can use these
#   scores in eventing.
# * Settings for making infinite difficulties.
# * Completely image based! The images used can be changed during the game too!
# * For scripters: Easily implement this mini-game into any scenes!
#   All you have to do is to create a mini game instance and loop it's update 
#   method (along with the Input and Graphics update methods) until the game 
#   is finished. 
#------------------------------------------------------------------------------- 
# * < Instructions >
#-------------------------------------------------------------------------------
# * Refer to the script's header for usage information!
#------------------------------------------------------------------------------- 
# * < Installation >
#-------------------------------------------------------------------------------
# * Place this script below Materials but above Main!
#-------------------------------------------------------------------------------
# * < Compatibility Info >
#-------------------------------------------------------------------------------
# * No known incompatibilities.
#-------------------------------------------------------------------------------
# * < Known Issues >
#-------------------------------------------------------------------------------
# * No known issues.
#-------------------------------------------------------------------------------
# * < Terms of Use >
#-------------------------------------------------------------------------------
# * Free to use for whatever purposes you want.
# * Credit me (Sixth) in your game, pretty please! 
# * Posting modified versions of this script is allowed as long as you notice me
#   about it with a link to it!
#===============================================================================


- Demo:

You can get the demo with the scripts here: https://www.mediafire.com/?pbncoik5eca2ai2

The demo contains all the mini-games and the necessary scripts too!

Also some additional scripts are included, but those are not required for the mini-games! All credits for the additional scripts go to their respective authors!

All graphics used for the mini-games in the demo is made by me. You can use them if you want.


- Videos:

- "Stay In Range" Mini-Game:

Spoiler


- QTE (Type 1) Mini-Game:

Spoiler


- QTE (Type 2) Mini-Game:

Spoiler


- Author's Notes:

In the demo, I made different settings for different difficulty levels.

The "Insane" mode is usually not meant to be put in a real game. They are almost impossible to finish (in the case of "Stay In Range" mini-game) or they are simply not worth to do due to the low amount of scores the player will earn from them (in the case of QTE (Type 1) mini-game).

You can, of course, change all settings if you want, I just wanted to make something annoying in the demo for each mini-games. :P

Kalacious's Currency System and Shop!

$
0
0

Kalacious Currency Generator and Currency Shop! 1.0.1
 

Creator: Kalacious (AKA Vindictive Personality)

Introduction
This set of scripts is designed to allow you to create your own currencies and also set up shops to use those scripts.

Features

  • Create new currencies
  • Create new shops for those currencies.

Screenshots

Currencies Screen:


Currencies Shop For GC currency:


How to Use
The details are in the headers of both scripts. The headers are well detailed, well documented.

Demo
None.

Script

Currency Script https://gist.github.com/AdamKyle/6046633

Currency Shop - Requires Currency Script https://gist.github.com/AdamKyle/6046623


FAQ
Questions? Please make sure to read the script headers as they are well documented. If you have questions or bug fixes or what have you please post.

Credit and Thanks
RM Community for your help.

Author's Notes
Version 1.0.1 brings some small fixes.

Version 1.0.2 Aligns some text in the description window and moves some icons over. We also allow for a bit longer Text for description, for exmple: Used for Ascended gear and stuffs..... Will work. I wouldn't go over it.

Tutorial 1 - Making a shop using the script (not script calls)

Some people have been having issues setting up shops using currencies and I thought I would take a moment to explain how to do that using no script calls, other then one you need for the NPC to open the shop.

First lets set up our currencies in the currency script:

module CURR  #--------------------------------------------------------------------------  # * Currency hash object created. The vocab here is the key, where  #   as the value is a hash of key=>value that defines the currency.  #--------------------------------------------------------------------------  CURR_HASH = {    'GC' => {      :full_name   => 'Guild Coin',      :icon        => 330,      :max         => 9999,      :description => 'Used for Ascended gear.',      :obtained    => 'Guild Battles'    },    'RT' => {      :full_name   => 'Resource Token',      :icon        => 278,      :max         => 9999,      :description => 'Used for crafting.',      :obtained    => 'Jobs'    },     'CC' => {      :full_name   => 'Celestial Coin',      :icon        => 526,      :max         => 9999,      :description => 'Used for Celestial gear.',      :obtained    => 'Celestial Rips'    },       }    COLOR_CURRENCY_NAME = 5  COLOR_CURRENCY_SYM = 5  COLOR_CURRENCY_OBTAINED = 2  COLOR_CURRENCY_DESCRIPT = 2    SHOW_IN_MENU = falseend


Next, we need to head over to the script shop and pick a currency to make shops from:

module SHOPS  #--------------------------------------------------------------------------  # * Create your shop objects here based on a particular vocab.  #--------------------------------------------------------------------------    SHOPS_HASH = {    'GC' => {      :item_type => [0, 0],      :item_id => [1, 2],      :price => [10, 14],    },    'RT' => {      :item_type => [0, 0],      :item_id => [1, 2],      :price => [10, 14],    }      }end


Here you can see that I went ahead and created two shops, notice how the Key of in the hash matches that of the currency in the currency script? You cannot have shops for currencies that do not exist.

Ok so now you want to call the shop, GS.create_shop('RT', true); will create a shop using the RT Currency, and set it so you can only buy items.


Tutorial 2 - Using the Script calls to create shops!


Some people are confused on how to create shops using only the script calls. lets delve into that, shall we? First we need to make sure we have some currencies set up, tutorial one, above, goes into that. Once we have some currencies set up we need to understand some basic and fundamental scrip calls: $kc_shop.create_item(item_type, item_id, price) - This creates a single item, this item is then stored in object of items call the master inventory list. item type is: 0 - items, 1 - weapons or 2 - armor. Item id is the id of that item in its respected type, where as price is - well how much it costs.


So:  $kc_shop.create_item(0, 1, 20) is: an item of id 1 at the price of 20.


No lets create some items shall we?

$kc_shop.create_item(0, 1, 20)$kc_shop.create_item(0, 2, 20)$kc_shop.create_item(0, 3, 20)

There, now we have three items. - wait, where am I creating these? All of these script calls are being done on the NPC you want, or the event, that is the shop for this type of shop.


--- See the Screen Shot ---


Next, since we have out items created, and our currency we need to create and call the shop into existence.


So we need this call: GS.call_shop(master_inventory, 'curr', puchase_only = false). How do we use it? like so:

GS.call_shop($kc_shop.inventory, 'GC',  false)

The above states, create me a shop based on the inventory list I passed in for the currency value of GC (note the string GC), where I can buy and sell items.


So we have the following:


Ok now lets run this:


Your database is going to be different from mine but you can see we have items 1, 2 and 3.


WAIT!!!!!!! - I have a shop called GC already set up in the hash with item 4,5 and 6....


So you created a hash shop called GC with item id 4, 5 and 6. Then you used the script calls to create a GC shop with item id 1,2 and 3? No problem. Two different script calls. The script call from Tutorial 1: GS.create_shop('RT', true); will create you shops BASED on that currencies hash in the shop script where as GS.call_shop($kc_shop.inventory, 'GC',  false) will create you a shop BASED on the inventory list you created for the NPC or event that is to act as the shop.


Why have both?


The hash is good for setting up static shops, shops that wont change. the other is for setting up fresh shops on the fly. You must always create the inventory list BEFORE calling the shop, you cannot alter the inventory list after the shop is called.


Note: you cannot create static shops and then have the script calls manipulate the static shop inventory list. That is not a feature I have built yet one I am looking at.


Looking for an Autotile unfolder

$
0
0

hi there..

I´m searching for a Script (or a Scriptwriter to do one), to unfold an Autotile and save it as a PNG.

What i try to get is:

Take for Example toe Rpg maker XP.

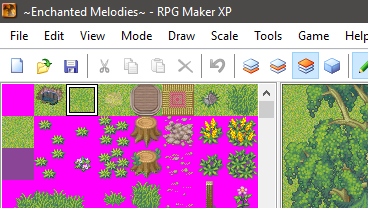
There you have those 7 Autotiles on Top of the Tilesets:
npr43pa4.jpg

(Autotile_1)


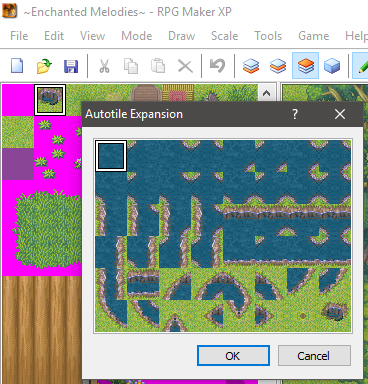
When you now doubleclick one, a new Window PopUp appears, which includes ALL 48 Tile constructions of this Autotile:
ixo95lq2.jpg

(Autotile_2)


What i want is such a thing for the Rpg Maker VXAce, but instead of just showing me those 48 Tiles, i want them to be saved in my project Folder.


Why do i need them?
I want to parallax map EVERYTHING. So i don´t want to use the Rpg maker mapping system, but show my Maps as Pictures.. since it´s a hilarious Job to do the Autotile Puzzling in Photoshop over and over again for each tile, it would be great to have them done ready for Para-Mapping.


Can someone do such a Script or is there already one known?


Autotile_1.jpg

Autotile_2.jpg

TheTrueCyprien's Yanfly Free Turn Battle Bugfix

$
0
0

Yanfly Free Turn Battle Bugfix
by TheTrueCyprien


Introduction
This script fixes some bugs in Yanfly's FTB script I discovered during testing.  If you find any other bug, you can post it here and I'll try to fix it. This also helps me as I'm using this script myself. However, it could take a while and I'll not solve compatibility related stuff.


Features
Currently known bugs that are fixed in this script:

1. If LIMITED_ACTIONS_PER_MEMBER is disabled, the party member won't change if he spent all of his own actions.

2. The game over message won't show up twice if the last living party member is killed by a counter attack or magic reflection.

3. Status window will now properly show after a troop event is executed.

4. Agi buffs and debuffs as well as ftb tags (on states) now affect enemies as well. However, I didn't get tags on enemies working (yet), so in

    order to give an enemy additional actions, you have to give him the bonus action feature or a state with ftb tags.


Script

#==============================================================================## ▼ Bug Fix for Yanfly Engine Ace - Battle System Add-On: Free Turn Battle# -- Last Updated: Dec 20, 2014# -- Authors: TheTrueCyprien, TheoAllen, Yanfly(original script)# -- Requires: Yanfly Engine Ace - Battle System Add-On: Free Turn Battle v1.02+##==============================================================================# ▼ Description# =-=-=-=-=-=-=-=-=-=-=-=-=-=-=-=-=-=-=-=-=-=-=-=-=-=-=-=-=-=-=-=-=-=-=-=-=-=-=# This script currently fixes the following bugs:# 1. If LIMITED_ACTIONS_PER_MEMBER is disabled, the party member won't change if#    he spent all of his own actions.# 2. If the last party member is killed by a counter attack or magic reflection,#    the game over message won't show up twice.# 3. Status window will now properly show after troop events.# 4. Enemies have now FTB actions as well, so AGI and FTB (de-)buffs will#    also work on them. However, you'll have to give the ftb points to them via#    bonus actions or states as I haven't managed to make notetags working for#    them.# If you find any other bug, message me and I might take a look.##==============================================================================# ▼ Instructions# =-=-=-=-=-=-=-=-=-=-=-=-=-=-=-=-=-=-=-=-=-=-=-=-=-=-=-=-=-=-=-=-=-=-=-=-=-=-=# To install this script, open up your script editor and copy/paste this script# to an open slot below the actual Free Turn Battle script, but above ▼ Main.# Remember to save.##==============================================================================#==============================================================================# ■ Game_BattlerBase#==============================================================================class Game_BattlerBase  #--------------------------------------------------------------------------  # new method: ftb_item_conditions_met?  #--------------------------------------------------------------------------  def ftb_item_conditions_met?(item)    return true unless SceneManager.scene_is?(Scene_Battle)    return true unless BattleManager.btype?(:ftb)    return true if BattleManager.in_turn?    return $game_party.ftb_actions_remaining >= item.ftb_cost if actor?    return $game_troop.ftb_actions_remaining >= item.ftb_cost if enemy?  end end # Game_BattlerBase#==============================================================================# ■ Game_Troop#==============================================================================class Game_Troop < Game_Unit   #--------------------------------------------------------------------------  # new method: ftb_actions_remaining  #--------------------------------------------------------------------------  def ftb_actions_remaining    return ftb_actions_maximum - ftb_actions_used  end   #--------------------------------------------------------------------------  # new method: ftb_actions_maximum  #--------------------------------------------------------------------------  def ftb_actions_maximum    n = 0    for member in $game_troop.members      next unless member.game_battlerbase_inputable_ftb      n += member.max_ftb_actions    end    return [n, YEA::FTB::MAXIMUM_FTB_ACTIONS].min  end   #--------------------------------------------------------------------------  # new method: ftb_actions_used  #--------------------------------------------------------------------------  def ftb_actions_used    n = 0    for member in $game_troop.members      next unless member.game_battlerbase_inputable_ftb      n += member.ftb_actions    end    return n  end end # Game_Troop#==============================================================================# ■ Game_Enemy#==============================================================================class Game_Enemy   #--------------------------------------------------------------------------  # Overwrite method: make action times  #--------------------------------------------------------------------------  def make_action_times    max_ftb_actions  end   #--------------------------------------------------------------------------  # Overwrite method: max ftb action  #--------------------------------------------------------------------------  def max_ftb_actions    n = make_ftb_action_times    n += agi_bonus_max_ftb_actions    n += trait_bonus_max_ftb_actions    return [n, 1].max  end endclass Scene_Battle   def end_ftb_action    if $game_party.inputable?      select_next_member    else      status_redraw_target(BattleManager.actor)      BattleManager.next_command      turn_start    end    $game_troop.make_actions  end end # Game_Enemy#==============================================================================# ■ Scene_Battle#==============================================================================class Scene_Battle < Scene_Base   #--------------------------------------------------------------------------  # overwrite method: perform_ftb_action  #--------------------------------------------------------------------------  def perform_ftb_action    hide_ftb_action_windows    @subject = BattleManager.actor    item = @subject.current_action.item    execute_action    process_event    loop do      @subject.remove_current_action      break if $game_troop.all_dead?      break unless @subject.current_action      @subject.current_action.prepare      execute_action if @subject.current_action.valid?    end    return if $game_troop.alive_members.size <= 0    process_action_end    @status_window.open    consume_ftb_action(item)    @subject.make_actions    @subject = nil    show_ftb_action_windows unless $game_party.all_dead?  end   #--------------------------------------------------------------------------  # overwrite method: next_ftb_member?  #--------------------------------------------------------------------------  def next_ftb_member?(last_index)    actor = BattleManager.actor    return true if actor.nil? || !actor.movable?    return false if $game_party.ftb_actions_maximum > actor.ftb_actions && !YEA::FTB::LIMITED_ACTIONS_PER_MEMBER    return false if actor.max_ftb_actions > actor.ftb_actions    return false if BattleManager.actor.index >= last_index    return BattleManager.actor.index != last_index  end    end #Scene_Battle#==============================================================================## ▼ End of File##==============================================================================


Credit and Thanks

TheTrueCyprien(optional)

TheoAllen

All credit goes to Yanfly for his awesome script!

Region Common Events

$
0
0

Region Common Events v1.0
Shaz


Introduction
This script lets you paint regions on your map and specify a common event to run when the player walks on or faces a tile with that region id.

Features
- Common event when you walk ON a tile with a region.
- Common event when you are FACING (but not ON) a tile with a region.

Screenshots
n/a

How to Use
Paste script into a new slot in Materials, below other scripts.

Paint regions over the map.
Create common events for each region.
Add map notes in the following format:
regevt: region_id mode common_event_id
where
- region_id is, obviously, the region id you've painted with
- mode is either on or face
- common_event_id is the common event to call when you are on or facing this tile

Mode "on" means the common event will run when you step onto a tile with that region id
Mode "face" means the common event will run when you are facing, but not standing on a tile with that region id

Examples:
regevt: 63 on 15
will call common event when the player walks on a tile with region 63. An example of this would be to play a splash SE when walking in shallow water (paint region 63 all over the water).

regevt: 62 face 12
will call common event 12 when the player is facing a tile with region 62. An example of this would be to do something when the player bumps into a wall (paint region 62 along the base of the wall).

Script

#============================================================================# REGION COMMON EVENTS# v1.0 by Shaz#----------------------------------------------------------------------------# This script allows you to paint regions on your map, and set up common# events to be run when the player walks onto or faces a tile with that# region id.#----------------------------------------------------------------------------# To Install:# Copy and paste into a new script slot in Materials.  This script aliases# existing methods, so can go below all other custom scripts.#----------------------------------------------------------------------------# To Use:# Paint regions on the map over the tiles you want to trigger events# Create a common event that will do whatever you want to happen when the#  player walks on or bumps into a tile with that region# Add one of the following lines to the map's note box## regevt: reg_id on common_event_id#         This will trigger the common event when the player steps on the tile#         eg: regevt: 63 on 15#             will call common event 15 when the player steps on a region 63 tile# regevt: reg_id face common_event_id#         This will trigger the common event when the player is facing, but not#         standing on the tile#         eg: regevt: 62 face 12#             will call common event 12 when the player is facing a region 62 tile#             (you might use this if you want something to happen when the player#             bumps into a wall - paint the bottom of the wall with region 62)#----------------------------------------------------------------------------# Terms:# Use in free or commercial games# Credit Shaz#============================================================================class Game_Map  #--------------------------------------------------------------------------  # * Setup  #--------------------------------------------------------------------------  alias shaz_re_game_map_setup setup  def setup(map_id)    shaz_re_game_map_setup(map_id)    setup_region_events  end  #--------------------------------------------------------------------------  # * Setup Common Events for Regions  #--------------------------------------------------------------------------  def setup_region_events    @reg_evt = {}    @req = []    @map.note.split(/[\r\n+]/).each do |line|      case line      when /regevt:\s*(\d+)\s*(\w+)\s*(\d+)/i        reg = $1.to_i        mode = $2        ce = $3.to_i        if !@reg_evt.has_key?(reg)          @reg_evt[reg] = {}        end        @reg_evt[reg][mode] = ce      end    end  end  #--------------------------------------------------------------------------  # * Check Region Events  #--------------------------------------------------------------------------  def check_region_event(x, y, dir)    reg = region_id(x, y)    next_reg = region_id(x_with_direction(x, dir), y_with_direction(y, dir))    if @reg_evt[reg] && @reg_evt[reg]["on"]      @req.push(@reg_evt[reg]["on"])    end    if @reg_evt[next_reg] && @reg_evt[next_reg]["face"]      @req.push(@reg_evt[next_reg]["face"])    end  end  #--------------------------------------------------------------------------  # * Frame Update  #     main:  Interpreter update flag  #--------------------------------------------------------------------------  alias shaz_re_game_map_update update  def update(main = false)    shaz_re_game_map_update(main)    $game_temp.reserve_common_event(@req.shift) if      !$game_temp.common_event_reserved? && @req.size > 0  endendclass Game_Player < Game_Character  #--------------------------------------------------------------------------  # * Frame Update  #--------------------------------------------------------------------------  alias shaz_re_game_player_update update  def update    old_x = @x    old_y = @y    old_dir = @direction    shaz_re_game_player_update    $game_map.check_region_event(@x, @y, @direction) if       @x != old_x || @y != old_y || @direction != old_dir  endend


FAQ


Credit and Thanks
- credit Shaz

Author's Notes
Okay for use in free and commercial games

Theolized Sideview Battle System (Version 1.4 + Patch!)

$
0
0

Theolized Sideview Battle System

(Or if you prefer, you may call it Theo Animated Battle)


Original Post : Theolized Sideview BS
Version : 1.3c (Stable) / 1.4 (Open beta)
Type : Battle System / Battle Engine
 
Opening :
This is my first battle system script and my masterpiece script so far. At first, I made this script for my own personal use. Back then when Ace was released, I always wanted an English version of Tankentai. But I heard nothing about the translation. I thought it was impossible tankentai to be translated to English. Moreover, it has bad compatibility to other scripts. Then I looked at avalaible battle scripts, and not even a single script I like. I just don't get the idea of those scripts. Then, hence my ambition started. 
 
Introduction :
This script was greatly inspired from Tankentai VX version and Eremidia : Dungeon! game. It's mainly aimed for free sequence animated battle without standard. I mean, there is no such a thing like "play all frames in row x" (the reason why I did this is because I hate standards). You can pick any grid in your spriteset. You can even use unorganized spriteset if you're too lazy to make one. As long as the format is consistent.
 
Features :

  • Animated battle of course
  • Free battler sequence
  • Free format battler sprite. You can even use unorganized spriteset as long as the format is consistent
  • Built-in damage counter
  • The rest are written in script ... and my sample game

Screenshots (taken from the old version) :


ss30.jpg
AED13.jpg
ss23.jpg
ss36.jpg

 
Video :

video for version 1.3 (also trailer for the sample game)

video for version 1.4

video for setup demonstration

You can look at my playlist if you want more

 
Scripts :
You could grab the raw on my github repository (old version, havent update it yet)

Or try Sample game
 

Latest version? Get it here | Mirror

Animation Samples / Alternative Demo : Click here | Mirror


Note :

If you want to download in solidfiles. Here is the way

7Drgida.jpg


IMPORTANT! Patch for version 1.4 - 04/02/2015
Just various bugfixes. Most likely going to stable version

https://github.com/t...1.4 Bugfixes.rb


How to patch? Simply put it below implementation

tsbs-patch.jpg


Newly Released addon :


Questions and Answers :

Q: Is it has a high compatibility?

A: Maybe yes, maybe no. I alter the damage flows. Any script that also alter the damage flow will highly not compatible. Such as YEA - Area of Effect or Lunatic Damage. But I haven't touch the HUD so var. I only provide animated battle sprite. So It's possible if you want to put any style of HUD for your battle system. It's also compatible with YEA Free turn battle, and Sabakhan Ao no Kiseki BS, and formar ATB (It should go under my script), EST - Ring System, AEA - Charge Turn Battle. Luna Engine. Doesn't work with Ocedic Motion Battle Camera.


In version 1.4, I tested the compatibility among various Yanfly Script. So, mine gonna be compatible with most of Yanfly's Include AoE or Lunatic series. Also, I have my own battle camera addon if you want.

 
Q: Can I use holder battler?
A: Yes, you can. But it will little bit troublesome. Since holder battler format has many rows in single battler image. I recommend you to split it up.
 
Q: What do you mean by "Format is consistent"?
A: If you decided to make 3x4 spriteset format like Kaduki do, then the rest of your battler sprites should also 3x4
 
Q: Can you make this script compatible with ...
A: No ... http://fc05.deviantart.net/fs70/f/2014/110/b/5/scripter_by_theoallen-d7fchsv.jpg But I will try if I like the script. As for Victor's scripts, it's a big NO.

 
Q: The xxx script is better than yours
A: I don't mind. I made it for my personal use afterall.


Terms of Use :

Q: What is the general ToU of this script?
A: Simply credit me as TheoAllen.

Q: May I use this script in Commercial games?
A: Yes. And you have to give me a free copy of the game.

Q: May I repost this script to other site?
A: Yes.

Q: May I edit this script?
A: Yes. Do as you want. And do not claim if it's yours

Q: May I take some money profit by editing this script?
A: No.

Q: May I translate the script to other language?
A: Yes.

Q: May I use this script for contest/challenge?
A: If it's non-profit challenge, yes. If it's profit challenge (like monetary gain), then NO.

Q: May I sell the third party script/addon?
A: No.

 
Special Thanks :
  • Eremidia : Dungeon!, some of script features are inspired on it
  • Mithran, for Graphical global object reference. If it's not by his script, I may not finish my battle system.
  • TDS, I found your basic movement module script on RMRK long time ago. Then I adopt it and I rewrote by my own.
  • Galenmereth for easing movement module
  • CielScarlet and Skourpy for the Translations


Author notes :
  • I use in script editor to make sequence movement instead of too many notetags as Symphony and Victor's do. It because there're already many script that uses notetags and notebox itself has no scroll.
  • As you know, I'm not so good at English. So I'm sorry in advance if there's any unclear informations. Feel free to ask
  • I will be more active on VXAN. You will get a better quick answer if you ask me there than this site.

Version 1.4 Release note :

  • My aim is to make it compatible with Luna Engine without extra patch. However, I haven't tested it with the latest version of TSBS.
  • It's still beta version. In other word, it may have many issues. You may test the script, but if you're going into real development, I suggest you to use the stable version 1.3c instead.
  • I haven't update the github at the moment. Considering it's still beta. Script must be taken by download the demo.
  • I changed the config 1 and config 2 parts. So, you need to update them as well.
  • Battle backdrop decoration addon is not translated yet. There're too many instructions that I can't really handle right now. Perhaps, sometimes. Also, it has a little glitch which I currently dunno how to fix. if you use Alarm Tone, in next battle that not use alarm tone, there 1 frame glitch where the screen blended with a wrong tone.
  • Sorry if the demo looks so messed up. I don't have the will to clear that up "OTL
  • TSBS version 1.4 will not updated. If you reported a bug, I will likely to make the patch instead.
  • Battle music taken from Dragonic Symphony if you wonder.
  • I added extra showcase of my scripts like animated portrait and hover notif tongue.png
  • Want to use the map BGM? That's mine, go ahead if you want to use. And you need to credit me as well.
  • After these hardworks, I will likely to take a very long break and will not touch anything complex related with the battle system (unless I choose to). But I will still provide the support for TSBS as long as I'm avalaible.

Woratana multiple Fog's for Ace

$
0
0

Update 09.05.2013


Since a lot of people asked about this, I fixed some issues with parallaxes in the script.

If other scripts are still conflict with this one, make sure to have all other scripts about this one in your script list.


Introduction
Since i saw a lot of people asking for a port from VX to Ace, i thought imma just try and go for it.
After a while trying to understand the scrolling behaviour of Ace i finnally got it running smile.png

Features
Let's u set up fog/cloud effects on your maps, just like in RM2K3, VX users will be familiar with the script.

Screenshots
fog.png

How to Use
Details on how to set it up are inside the script, there is also alot of information around, especially on VX sites, since it's a pretty known script.

Script

#===============================================================# ● [VX] ◦ Multiple Fogs ◦ □# * Use unlimited layers of fog *#--------------------------------------------------------------# ◦ by Woratana [woratana@hotmail.com]# ◦ Thaiware RPG Maker Community# ◦ Released on: 13/05/2008# ◦ Version: 1.0# ◦ ported to VX Ace by Necromus 17/03/2012#--------------------------------------------------------------#==================================================================# ** HOW TO USE **# * use event command 'Script...' for the any script line below~#-----------------------------------------------------------------##---------------------------------------------------------------# ** SETUP FOG PROPERTIES & SHOW FOG **# * You have to setup fog properties, before show fog~#-------------------------------------------------------------# * There are 3 ways to setup fog properties:# >> Setup Fog [Custom]:# $fog.name = 'image_name' # Image file name, must be in fog image path (setup path below).# $fog.hue = (integer) # Fog's hue. 0 - 360, 0 for no hue.# $fog.tone = [red, green, blue, gray] # Fog's tone color.# $fog.opacity = (integer) # Fog's opacity. 0 - 255, you will not see fog in 0.# $fog.blend = (0, 1, or 2) # Fog's blend type. 0 for Normal, 1 for Add, 2 for Subtract.# $fog.zoom = (integer) # Fog's size (in %). 100 for normal size.# $fog.sx = (+ or - integer) # Fog's horizontal move speed.# $fog.sy = (+ or - integer) # Fog's vertical move speed.## >> Setup Fog [From Preset]:# (You can setup fog presets, in part FOG PRESET SETUP below)# $fog.load_preset(preset_id)## >> Setup Fog [From Fog that showing]:# $fog.load_fog(fog_id)##--------------------------------------------------------------# ** SHOW FOG **#-------------------------------------------------------------# After setup the fog, show fog by call script:# $fog.show(fog_id)## In case you want to show new fog on same ox, oy, tone as old fog. Call Script:# $fog.show(old_fog_id, false)## * fog_id: the ID number you want to put this fog in.# (It can be any positive number or zero)## After you show fog, the fog properties you've set will replace with default setting.# (You can setup default setting, in part FOG DEFAULT SETTING below)##--------------------------------------------------------------# ** DELETE FOG **#-------------------------------------------------------------# You can delete 1 or more fog(s) at a time by call script:# $fog.delete(fog_id, fog_id, fog_id, ...)##---------------------------------------------------------------# ** OLD FOG CONTROL EVENT COMMANDS **#-------------------------------------------------------------# Change Fog Tone:# $game_map.fogtone(fog_id, [red, green, blue, gray], duration)# e.g. $game_map.fogtone(1, [100,200,-100,0], 10)# Change Fog Opacity:# $game_map.fogopac(fog_id, new_opacity, duration)# e.g. $game_map.fogopac(2, 200, 10)##---------------------------------------------------------------# ** ADDITIONAL SETTINGS **#-------------------------------------------------------------# Change Fog Image's Path:# $game_map.fog_path = 'image_path'# e.g. $game_map.fog_path = 'Graphics/Pictures/'# Turn ON/OFF [Automatically clear all fogs when transfer player]:# $game_map.fog_reset = (true / false)##===============================================================#==================================================================# START ** MULTIPLE FOG SETUP **#==================================================================class Game_Mapalias wora_mulfog_gammap_ini initializedef initialize    wora_mulfog_gammap_ini    #==================================================================    # ** MULTIPLE FOG SETUP ** SETTINGS    #--------------------------------------------------------------    @fog_path = 'Graphics/Pictures/'    # Fog image's path    @fog_reset = true # (true or false)    # Automatically clear all multiple fogs when transfer player    #==================================================================    @mulfog_name = []    @mulfog_hue = []    @mulfog_opacity = []    @mulfog_blend_type = []    @mulfog_zoom = []    @mulfog_sx = []    @mulfog_sy = []    @mulfog_ox = []    @mulfog_oy = []    @mulfog_tone = []    @mulfog_tone_target = []    @mulfog_tone_duration = []    @mulfog_opacity_duration = []    @mulfog_opacity_target = []endendclass Wora_Multiple_Fogdef set_default    #==================================================================    # ** MULTIPLE FOG SETUP ** FOG DEFAULT SETTING    #--------------------------------------------------------------    @name = ''    @hue = 0    @opacity = 64    @blend = 0    @zoom = 200    @sx = 0    @sy = 0    @tone = [0,0,0,0]    #==================================================================enddef load_preset(preset_id)    case preset_id#==================================================================# ** MULTIPLE FOG SETUP ** FOG PRESET SETUP#--------------------------------------------------------------    when 1 # Preset ID 1     @name = 'Cloud3'     @hue = 0     @tone = [0,0,20,0]     @opacity = 100     @blend = 0     @zoom = 150     @sx = 3     @sy = 3    when 2 # Preset ID 2     @name = '002-Clouds01'     @hue = 0     @tone = [0,0,0,0]     @opacity = 200     @blend = 1     @zoom = 200     @sx = -2     @sy = -2    #==================================================================endend#==================================================================# END ** MULTIPLE FOG SETUP **# * Don't change anything below unless you know what you're doing.#==================================================================attr_accessor :name, :hue, :opacity, :blend, :zoom, :sx, :sy, :tonedef initialize    set_defaultenddef load_fog(id)    @name = $game_map.mulfog_name[id].sub($game_map.fog_path, '')    @hue = $game_map.mulfog_hue[id]    @opacity = $game_map.mulfog_opacity[id]    @blend = $game_map.mulfog_blend_type[id]    @zoom = $game_map.mulfog_zoom[id]    @sx = $game_map.mulfog_sx[id]    @sy = $game_map.mulfog_sy[id]    tn = $game_map.mulfog_tone[id]    @tone = [tn.red, tn.blue, tn.green, tn.gray]enddef show(id, reset_all = true)    $game_map.mulfog_name[id] = $game_map.fog_path + @name    $game_map.mulfog_hue[id] = @hue    $game_map.mulfog_opacity[id] = @opacity    $game_map.mulfog_blend_type[id] = @blend    $game_map.mulfog_zoom[id] = @zoom    $game_map.mulfog_sx[id] = @sx    $game_map.mulfog_sy[id] = @sy    $game_map.mulfog_tone[id] = Tone.new(@tone[0], @tone[1], @tone[2], @tone[3])    if $game_map.mulfog_ox[id].nil? or reset_all     $game_map.mulfog_ox[id] = 0     $game_map.mulfog_oy[id] = 0     $game_map.mulfog_tone_target[id] = Tone.new(0, 0, 0, 0)     $game_map.mulfog_tone_duration[id] = 0     $game_map.mulfog_opacity_duration[id] = 0     $game_map.mulfog_opacity_target[id] = 0    end    set_defaultenddef delete(*args)    args.each do |id|     $game_map.mulfog_name[id] = ''    endendendclass Game_Interpreteralias wora_mulfog_interpret_com201 command_201#--------------------------------------------------------------------------# * Transfer Player#--------------------------------------------------------------------------def command_201    if $game_map.fog_reset     if @params[0] == 0; id_map = @params[1]     else; id_map = $game_variables[@params[1]]     end     $game_map.clear_mulfog if id_map != @map_id    end    wora_mulfog_interpret_com201endendclass Game_Mapattr_accessor :mulfog_name, :mulfog_hue, :mulfog_opacity, :mulfog_blend_type,:mulfog_zoom, :mulfog_sx, :mulfog_sy, :mulfog_ox, :mulfog_oy, :mulfog_tone,:mulfog_tone_target, :mulfog_tone_duration, :mulfog_opacity_duration,:mulfog_opacity_target, :fog_reset, :fog_pathalias wora_mulfog_gammap_upd updatedef update(main)    wora_mulfog_gammap_upd(main)    @mulfog_name.each_index do |i|     next if @mulfog_name[i].nil? or @mulfog_name[i] == ''     # Manage fog scrolling     @mulfog_ox[i] -= @mulfog_sx[i] / 8.0     @mulfog_oy[i] -= @mulfog_sy[i] / 8.0     # Manage change in fog color tone     if @mulfog_tone_duration[i] >= 1        d = @mulfog_tone_duration[i]        target = @mulfog_tone_target[i]        @mulfog_tone[i].red = (@mulfog_tone[i].red * (d - 1) + target.red) / d        @mulfog_tone[i].green = (@mulfog_tone[i].green * (d - 1) + target.green) / d        @mulfog_tone[i].blue = (@mulfog_tone[i].blue * (d - 1) + target.blue) / d        @mulfog_tone[i].gray = (@mulfog_tone[i].gray * (d - 1) + target.gray) / d        @mulfog_tone_duration[i] -= 1     end     # Manage change in fog opacity level     if @mulfog_opacity_duration[i] >= 1        d = @mulfog_opacity_duration[i]        @mulfog_opacity[i] = (@mulfog_opacity[i] * (d - 1) + @mulfog_opacity_target[i]) / d        @mulfog_opacity_duration[i] -= 1     end    endend#--------------------------------------------------------------------------# * Start Changing Fog Color Tone#--------------------------------------------------------------------------def fogtone(i, tone, duration)    duration = duration * 2    tone = Tone.new(tone[0], tone[1], tone[2], tone[3])    @mulfog_tone_target[i] = tone.clone    @mulfog_tone_duration[i] = duration    if @mulfog_tone_duration[i] == 0     @mulfog_tone[i] = @mulfog_tone_target[i].clone    endend#--------------------------------------------------------------------------# * Start Changing Fog Opacity Level#--------------------------------------------------------------------------def fogopac(i, opacity, duration)    duration = duration * 2    @mulfog_opacity_target[i] = opacity * 1.0    @mulfog_opacity_duration[i] = duration    if @mulfog_opacity_duration[i] == 0     @mulfog_opacity[i] = @mulfog_opacity_target[i]    endenddef clear_mulfog    @mulfog_name.each_index {|i| @mulfog_name[i] = '' }endend$worale = {} if !$worale$worale['MutipleFog'] = true$fog = Wora_Multiple_Fog.newclass Spriteset_Mapalias wora_mulfog_sprmap_crepal create_parallaxalias wora_mulfog_sprmap_updpal update_parallaxalias wora_mulfog_sprmap_dispal dispose_parallaxdef create_parallax    @mulfog = []    @mulfog_name = []    @mulfog_hue = []    wora_mulfog_sprmap_crepalenddef update_parallax     wora_mulfog_sprmap_updpal    $game_map.mulfog_name.each_index do |i|     next if $game_map.mulfog_name[i].nil?     # If fog is different than current fog     if @mulfog_name[i] != $game_map.mulfog_name[i] or @mulfog_hue[i] != $game_map.mulfog_hue[i]        @mulfog_name[i] = $game_map.mulfog_name[i]        @mulfog_hue[i] = $game_map.mulfog_hue[i]        if @mulfog[i].nil?         @mulfog[i] = Plane.new(@viewport3)         @mulfog[i].z = 3000        end        if @mulfog[i].bitmap != nil         @mulfog[i].bitmap.dispose         @mulfog[i].bitmap = nil        end        if @mulfog_name[i] != ''         @mulfog[i].bitmap = Cache.load_bitmap('', @mulfog_name[i], @mulfog_hue[i])        end        Graphics.frame_reset     end     next if @mulfog[i].bitmap.nil?     # Update fog plane     @mulfog[i].zoom_x = ($game_map.mulfog_zoom[i] / 100.0) if @mulfog[i].zoom_x != ($game_map.mulfog_zoom[i] / 100.0)     @mulfog[i].zoom_y = ($game_map.mulfog_zoom[i] / 100.0) if @mulfog[i].zoom_y != ($game_map.mulfog_zoom[i] / 100.0)     @mulfog[i].opacity = $game_map.mulfog_opacity[i] if @mulfog[i].opacity != $game_map.mulfog_opacity[i]     @mulfog[i].blend_type = $game_map.mulfog_blend_type[i] if @mulfog[i].blend_type != $game_map.mulfog_blend_type[i]     @mulfog[i].ox = $game_map.mulfog_ox[i] + $game_map.display_x * 32 if @mulfog[i].ox != $game_map.mulfog_ox[i] + $game_map.display_x * 32     @mulfog[i].oy = $game_map.mulfog_oy[i] + $game_map.display_y * 32 if @mulfog[i].oy != $game_map.mulfog_oy[i] + $game_map.display_y * 32     @mulfog[i].tone = $game_map.mulfog_tone[i] if @mulfog[i].tone != $game_map.mulfog_tone[i]    endenddef dispose_parallax    @mulfog.each_index do |i|     next if @mulfog[i].nil?     @mulfog[i].bitmap.dispose if !@mulfog[i].bitmap.nil?     @mulfog[i].dispose    end    wora_mulfog_sprmap_dispalendend#==================================================================# [END] VX Multiple Fog by Woratana [woratana@hotmail.com]#==================================================================


Credit and Thanks
Woratana for this awesome piece of code

Author's Notes
Have fun smile.png
Woratana's blog:
http://boxsuke.exteen.com/

Lune Unlimited Skill Tree

$
0
0

Lune Unlimited Skill Tree


Compatible with: RMVXAce
Compatibility :excelent
Difficulty to use: medium
Processing demand?: medium
 

Using condition


Portuguese user? Portuguese Script link
  Can be modified and advertise, but keep credits to me


Script Usage and Features


  The script adds the skill tree, it is highly configurable and made to look like any rpg game skill tree, read below the functions to know what you can do.
 
Features are:
- Can be full pictured
- Any number of trees for each character
- Can be used the default icons on rpg maker vx ace, or pictures
- Many configurations for skill adding
 
IT IS Compatible with my lune passive skills HERE
For easier, faster, but less powerful skill tree, choose my old Lune Skill Tree
http://forums.rpgmakerweb.com/index.php?/topic/13212-lune-skill-tree/
 

Script


Demo if needed: Download
raw script: http://pastebin.com/raw.php?i=tcXVtZc8


Videos and Images


Pictures and Vídeo in portuguese, but the script has beem translated to english :)
FpOnj2h.png

 
bLb8xuS.png


Credits and stuff


 Raizen for the script
Mistyrol for design
V@gner Kouhai for the big face

Actor Damage Sounds

$
0
0

Actor Damage Sounds
by: Rinobi

Version History

  • 1.00 [12/05/2015] Initial Release
  • 1.10 [12/06/2015] ATB Compatability Update
  • 1.20 [12/08/2015] Fixed occasional crash when enemy attacks.
  • 1.30 [12/09/2015] Fixed crash when unarmored actor is damaged.
  • 1.70 [12/10/2015] Major update. Fixed double sound effect bug.
    Added sound options for barehanded and unarmored.
    Shield armor types now have priority while actor is guarding.
    Sensible default settings for making easy distinctions.
  • 1.80 [01/07/2016] Option to include/exclude weapon SE from skills added.
  • 2.00 [08/10/2016] Note tags added. Screen shake options included.


Introduction

This script allows damage sound effects to be assigned for specific weapons and armor types.

Note tags can also be used to give skills unique damage sound and screen-shake effects.


Features

  • Weapons and armors can now have their own sound effects.
  • Note tags allow skills to have unique sound and screen shake effects.


Screenshots

Spoiler

ADS_00.PNGADS_01.PNG


Script

Spoiler

module RINOBI module ActorSound # DO NOT MODIFY
#===============================================================================
#                              Actor Damage Sounds
#::::::::::::::::::::::::::::::::::::::::::::::::::::::::::::::::::::::::::::::
# By: Rinobi
#------------------------------------------------------------------------------
# 
# Damage sound effects can now be assigned for specific weapons and armors.
# 
#==============================================================================
# # VERSION HISTORY
#------------------------------------------------------------------------------
# @ 1.0 [12/05/2015] Completed 
# @ 1.1 [12/06/2015] ATB Compatability Update
# @ 1.2 [12/08/2015] Fixed occasional crash when enemy attacks.
# @ 1.3 [12/09/2015] Fixed crash when actor is damaged without equipped armor.
# @ 1.7 [12/10/2015] Major update. Fixed double sound effect bug.
#                    Added sound options for barehanded and no armor.
#                    Shield Armor types have priority while guarding.
#                    Sensible default settings for making easy distinctions.
# @ 1.8 [01/07/2016] Option to include/exclude weapon SE from skills added.
# @ 2.0 [08/10/2016] Note tags added. Screen shake options included.
#==============================================================================
# # INSTRUCTIONS
#------------------------------------------------------------------------------
# Paste this script below Materials and above Main Process.
# See 'SETTINGS' for addtional instructions.
#-
#------------------------------------------------
#  <Sound: file_name, volume, pitch>
#------------------------------------------------
# Place within the 'Note' textbox of 'Skills'
#-
# The sound effect to be played upon dealing
# damage to the target with said skill.
#-
# EX: <Sound: Gun1, 100, 60>
#------------------------------------------------
#  <Shake: power, speed, duration>
#------------------------------------------------
# Place within the 'Note' textbox of 'Skills'
#-
# The screen shake effect to be used used upon 
# dealing damage to the target with said skill.
#-
# EX: <Shake: 5, 10, 20>
#==============================================================================
# # SETTINGS
# -----------------------------------------------------------------------------
# Adjust the below settings to your liking.
#-
  
  #======================================================================
  # >> Armor Slot
  # ---------------------------------------------------------------------
  # The slot id for armor. Recommended settins 2 or 3. This controls 
  # which equipment slot actor damage sound effects relate to.
  #-
  # Weapon = 0 , Shield = 1 , Head = 2 , Body = 3 , Accessory = 4
  #======================================================================
  ArmorSlot = 3 # Default 3, Ignored if guarding with a shield.
  
  #======================================================================
  # >> Guard Slot
  # ---------------------------------------------------------------------
  # Allows an alternate sound effect to be played while an actor is
  # guarding. The armor type of the equipment slot below will take
  # priority over the above setting.
  #-
  # Weapon = 0 , Shield = 1 , Head = 2 , Body = 3 , Accessory = 4
  #======================================================================
  GuardSlot = 1 # Default 1, Has priority while guarding with a shield.
  
  #======================================================================
  # >> Skill SE
  # ---------------------------------------------------------------------
  # Controls whether or skills other than Attack inherit sound effects
  # from weapons. Sound effect note tags will always take priority.
  #-
  # true or false
  #======================================================================
  Use_Attack_SE = false # Skills use Normal Attack SE by default.
  
  #======================================================================
  # >> Default Screen Shake
  # ---------------------------------------------------------------------
  # Controls the default settings for the screen shake effect. To disable
  # screen shake for actors or enemies, set either of the below values to
  # to nil. If disabled, note tags will still trigger screen shake.
  #-
  # [Power, Speed, Duration]
  #======================================================================
  Enemy_Screen_Shake = nil # When Enemy Recieves Damage.
  Actor_Screen_Shake = [5, 5, 10] # When Actor Recieves Damage.
  
  #======================================================================
  # >> Armor SE Settings
  # ---------------------------------------------------------------------
  # Sound effect played when an actor recieves damage.
  # Sound effect file names found in (Project_Name)/Audio/SE
  # The below list is ordered by Armor Type IDs, with 0 being the
  # SE used when no armor is equipped. Addtional armor types may be
  # added or removed from the list below.
  #======================================================================
  ActorArmor = { # 
  0 => {:File => "Damage3", :Volume => 99, :Pitch => 100}, # Naked
  1 => {:File => "Damage3", :Volume => 95, :Pitch => 120}, # General Armor
  2 => {:File => "Damage2", :Volume => 90, :Pitch => 150}, # Magic Armor
  3 => {:File => "Damage4", :Volume => 85, :Pitch => 110}, # Light Armor
  4 => {:File => "Damage1", :Volume => 80, :Pitch => 150}, # Heavy Armor
  } # DO NOT MODIFY
  
  #======================================================================
  # >> Weapon SE Settings
  # ---------------------------------------------------------------------
  # Sound effect played when an enemy recieves damage.
  # Sound effect file names found in (Project_Name)/Audio/SE
  # The below list is ordered by Weapon Type IDs, with 0 being the
  # SE used when no weapon is equipped. Addtional weapon types may be
  # added or removed from the list below.
  #======================================================================
  ActorWeapon = { # 
  0  => {:File => "Blow3"  , :Volume => 87, :Pitch => 125}, # Barehanded
  1  => {:File => "Slash1" , :Volume => 99, :Pitch =>  95}, # Axe
  2  => {:File => "Slash2" , :Volume => 70, :Pitch => 150}, # Claw
  3  => {:File => "Slash10", :Volume => 80, :Pitch => 130}, # Spear
  4  => {:File => "Sword3" , :Volume => 78, :Pitch => 150}, # Sword
  5  => {:File => "Flash2" , :Volume => 85, :Pitch => 150}, # Katana
  6  => {:File => "Bow3"   , :Volume => 80, :Pitch => 100}, # Bow
  7  => {:File => "Slash1" , :Volume => 65, :Pitch => 150}, # Dagger
  8  => {:File => "Blow8"  , :Volume => 99, :Pitch =>  90}, # Hammer
  9  => {:File => "Blow3"  , :Volume => 72, :Pitch => 125}, # Staff
  10 => {:File => "Gun1"   , :Volume => 90, :Pitch => 100}, # Gun
  } # DO NOT MODIFY
#==============================================================================
# # COMPATIBILITY
#------------------------------------------------------------------------------
# Created for use within RPG Maker VX Ace
#- 
# Alias Methods:
#  @ prepare                in Game_Action
#  @ perform_damage_effect  in Game_Actor
#  @ perform_damage_effect  in Game_Enemy
#===============================================================================
# ** End of Settings
#-------------------------------------------------------------------------------
# Editing beyond this line may result in undesirable side-effects.
#===============================================================================

  #======================================================================
  # >> Regexp Module
  #======================================================================
  module Regexp
    Sound_Override = /<Sound:[ ](.*?),[ ](\d+),[ ](\d+)>/i
    Shake_Override = /<Shake:[ ](\d+),[ ](\d+),[ ](\d+)>/i
  end # Regexp
  
end end # DO NOT MODIFY
#==============================================================================
# ** IMPORT SCRIPT
#------------------------------------------------------------------------------
$imported = {} if $imported.nil?
$imported[:RIN_ADamageSounds] = true
#==============================================================================
# ** Game_Action
#------------------------------------------------------------------------------
#  This class handles battle actions. This class is used within the
# Game_Battler class.
#==============================================================================
class Game_Action
  #--------------------------------------------------------------------------
  # * Alias Method: prepare
  #--------------------------------------------------------------------------
  alias :se_prepare :prepare
  def prepare ; se_prepare = $acting = @subject end # prepare
end # Game_Action
#==============================================================================
# ** Game_Actor
#------------------------------------------------------------------------------
#  This class handles actors. It is used within the Game_Actors class
# ($game_actors) and is also referenced from the Game_Party class ($game_party).
#==============================================================================
class Game_Actor < Game_Battler
  include RINOBI::ActorSound
  #--------------------------------------------------------------------------
  # * Alias Method: Execute Damage Effect
  #--------------------------------------------------------------------------
  alias :rinse_damage_effect :perform_damage_effect
  def perform_damage_effect
    return rinse_damage_effect unless $game_party.in_battle
    if guard? && equips[GuardSlot].is_a?(RPG::Armor)
      armor = equips[GuardSlot].atype_id
    elsif equips[ArmorSlot].nil? then armor = 0
    else armor = equips[ArmorSlot].atype_id end #--
    return rinse_damage_effect unless ActorArmor.include?(armor)
    file   = ActorArmor[armor][:File]
    volume = ActorArmor[armor][:Volume]
    pitch  = ActorArmor[armor][:Pitch]
    if $acting.current_action.item.note =~ Regexp::Shake_Override
      $game_troop.screen.start_shake($1.to_i, $2.to_i, $3.to_i)
    elsif !Actor_Screen_Shake.nil?
      ess = Actor_Screen_Shake
      $game_troop.screen.start_shake(ess[0], ess[0], ess[0])
    end #--
    @sprite_effect_type = :blink
    RPG::SE.new(file, volume, pitch).play
  end # perform_damage_effect
end # Game_Actor
#==============================================================================
# ** Game_Enemy
#------------------------------------------------------------------------------
#  This class handles enemies. It used within the Game_Troop class 
# ($game_troop).
#==============================================================================
class Game_Enemy < Game_Battler
  include RINOBI::ActorSound
  #--------------------------------------------------------------------------
  # * Alias Method: Execute Damage Effect
  #--------------------------------------------------------------------------
  alias :rinse_damage_effect :perform_damage_effect
  def perform_damage_effect
    return rinse_damage_effect unless $acting.is_a?(Game_Actor)
    if $acting.equips[0].nil? then weapon = 0
    else weapon = $acting.equips[0].wtype_id end #--
    if $acting.current_action.item.note =~ Regexp::Sound_Override
      file, volume, pitch = $1, $2.to_i, $3.to_i
    else 
      unless $acting.current_action.attack?
        return rinse_damage_effect unless Use_Attack_SE
      end #--
      file   = ActorWeapon[weapon][:File]
      volume = ActorWeapon[weapon][:Volume]
      pitch  = ActorWeapon[weapon][:Pitch]
    end #--
    if $acting.current_action.item.note =~ Regexp::Shake_Override
      $game_troop.screen.start_shake($1.to_i, $2.to_i, $3.to_i)
    elsif !Enemy_Screen_Shake.nil?
      ess = Enemy_Screen_Shake
      $game_troop.screen.start_shake(ess[0], ess[0], ess[0])
    end #--
    @sprite_effect_type = :blink
    RPG::SE.new(file, volume, pitch).play
  end # perform_damage_effect
end # Game_Enemy
#==============================================================================
# @@@@@  @   @  @@@@    @@@@@  @@@@@   @@@@@  @@@@@  @@@@   @@@@@  @@@@@  @@@@@ 
# @      @@  @  @   @   @   @  @       @      @      @   @    @    @   @    @   
# @@@@@  @ @ @  @   @   @   @  @@@@    @@@@@  @      @@@@     @    @@@@@    @   
# @      @  @@  @   @   @   @  @           @  @      @  @     @    @        @   
# @@@@@  @   @  @@@@    @@@@@  @       @@@@@  @@@@@  @   @  @@@@@  @        @   
#==============================================================================


Latest Version: ActorDamageSounds_20.txt

Previous Version: ActorDamageSounds_18.txt


Random Encounter Events

$
0
0


This script allows you to run a common event when you encounter an enemy through "random encounter".

When the common event finishes executing, the random encounter battle will begin.

In this common event, you have the opportunity to run some extra logic before the battle occurs. The enemy troop that you will battle is available, and you can use this information in your event. For example, you may choose to display a message if a certain troop is encountered.

This script provides a special command that allows you to "cancel" the encounter, allowing you to create mechanics that allow players to skip encounters if they do not wish to battle.


Get it at HimeWorks!

External Text v3.3.4 (Write your game in an organized manner! Translate with ease!)

$
0
0

Freebies_Enelvon_01A.png

 
Introduction
This script allows you to display text (as the Show Text event command) that is stored in external files. It will automatically wrap the text and divide it into as many messages as necessary, saving you the trouble of worrying about it yourself. The external files are extremely easy to configure, and support showing faces as well as all of the usual text codes. Displaying a block of text is as easy as a single-line script call!

Change Log

  • v1.0 (November 30th, 2012) - Initial release.
  • v1.1 (December 1st, 2012) - Fixed a bug with Battle Test not loading text.
  • v1.2 (December 1st, 2012) - Added nameboxes and the newline tag.
  • v1.3 (December 6th, 2012) - Fixed a bug with persistent colors.
  • v1.4 (December 6th, 2012) - Added an additional style for names.
  • v1.5 (December 7th, 2012) - Added the [FName] tag, made adding tags easier for scripters, fixed a bug with the namebox, added block text call.
  • v1.6 (December 10th, 2012) - Added in the ability to alter message window location and background.
  • v1.7 (December 11th, 2012) - Added the [get_text] calls and a text code for referencing $game_text
  • v1.8 (December 12th, 2012) - Added a fix for the choice window
  • v1.9 (June 1st, 2013) - Width calculation is now based solely on the font size of Window_Message, rather than the default size
  • v2.0 (June 1st, 2013) - Added scrolling text support
  • v2.1 (June 13th, 2013) - Added Unicode support
  • v2.2 (June 30th, 2013)     - Fixed issue with EOL characters and get_text
  • v3.0 (Released May 23rd, 2015) - Small bugfixes, new ways to use block text, and prettier code!
  • v3.1 (May 24th, 2015) - Now allows multiple files, as well as subfolders for organization!
  • v3.2 (May 26th, 2015) - Allows you to override keys on a file-by-file basis!
  • v3.3 (June 30th, 2015) - Allows you to manage choices! Extractor plugin released!
  • v3.3.1 (July 5th, 2015) - Minor update to fix the way that \t interacts with escape characters.
  • v3.3.2 (July 5th, 2015) - Fix for 3.3.1.
  • v3.3.3 (July 5th, 2015) - Final fix for 3.3.1/3.3.2.
  • v3.3.4 (July 31st, 2015) - Fix for save error provided by Source.


Features

  • Use an organized directory tree of text files to hold all of your game text - your outline can become your game!
  • Simple to configure - takes far less time than trying out various combinations of words in order to find the perfect length for a line!


Note on Updating from v3.0 or below to v3.1 or higher
Your Text.txt file will still work, don't worry! Just make sure to move it to a new folder named Text inside of the Data folder. You can divide it up into whatever kind of organization you'd like now!
 
How to Use
This script is incredibly easy to use. There is little in-script configuration - all you really need to do is format your text file correctly and call the text from events when it is appropriate.

Setting up your Text File
This is actually extremely simple. The first thing you have to do is create a directory named Text inside of your Data directory. We'll be using this folder to store all of our text data - I would recommend using a program like Notepad++ instead of the default Windows Notepad when editing the text files, for the sake of formatting. Any text file that we place in this Text folder will be read and included in the game! You can also add subfolders to the Text directory -- everything that they contain will be used, too.

Inside of our text file, the first thing we'll want to do is define a block of text. We do that like this:
 
[Key] !Name!

Replace !Name! with whatever you would like the block to be named. You will use the name to call it in the game, so make it something you'll associate with the text.

If we want to add a face, we've got four options.

Option 1:
 

[Face] !Faceset!, !Index!

Here we replace !Faceset! with the name of the faceset image we're using and !Index! with the index of the face in the file, starting at 0.

Option 2
 

[AFace] !Index!

Here we replace !Index! with the index of an actor. Whatever face they have at the time the text is displayed (including any changes made through the Change Actor Graphic event command) will be shown.

Option 3:
 

[PFace] !Index!

For this, we replace !Index! with an index in the party (starting at 0). It will display the current face of whatever actor is in that slot of the party when the text is displayed.

Option 4:
 

[DFace] !Name!

This one requires some configuration in the script itself. Go to SES::ExternalText and find the Faces hash (which should be easy - it's the only thing in the module). Define a face inside of it with this format:
 

"Name" => ["Faceset", Index],

I think each part of that is self-explanatory - "Name" is a string that you will use in the !Name! spot of the tag to call the face, "Faceset" is the name of the faceset file, and Index is the index of the face in the faceset, starting at 0.

Additionally, please note the [FName] tag, added in 1.5. It allows you to display both a face and a name with one tag - it will display the given name and a face from the Faces hash in the same manner that [DFace] would.

As for text itself, we just write that out anywhere below a [Key] tag. Going down to a new line (by pressing enter) will only add a space to the text, not a new line, so you can use it for the sake of an easily readable file. Just be careful not to hit space and then enter, or you will have two spaces instead of one.

After you've defined your first text block, just add another [Key] tag and keep going! You can have as many as you want, and the order they're in doesn't affect anything, so feel free to organize things however you'd like! You can comment out lines by beginning them with either # or // (though these only work at the beginning of a line - leading spaces are okay, but not text, so you can still use them in dialogue) in order to divide the file into sections.

Note that you will still need to manually handle choices - due to the way those work, they would be difficult to effectively apply through a script. It could be done with labels, but... it's easy enough to create choices yourself. If there's enough demand for it I'll set up a system, but I think it's fine as is.

Version 1.2 also adds in the ability to have a name box. We do that like this:
 

[Name] !Name!

Just replace !Name! with the name you want to display - this will take text codes, so you can specify actors or party members with \n or \p, and color the names in different ways.

v1.2 added the [Line] tag for new lines, but that's now deprecated -- add new lines just by adding them in your text editor! It looks much cleaner. The [Line] tag still works, for the sake of backwards compatibility. [v3.3 Note: No longer deprecated for Choices]

1.6 gives us the [Position] and tags, which can be used to set the message window's position and background, respectively. We include these before the text, like we would for most tags. View the Header of the script for instructions on using these.

As of v1.7, you can use a text code to call text in any place that they can be used. This is only the message window by default, and I do not intend to add global text code functionality into this script, as I am sure there are others that do so. By using one of them, you can have all of your Database item names and descriptions come from Text.txt, allowing you to easily translate a game into multiple languages. Note that this code does not autowrap text. You can use it like this:
 

\t[!Key!]

!Key! is, of course, the key of the text you want to use.

Also in v1.7 are some script calls to get the text (but not the face/name/etc) from a particular key. Read the Header of the script for more information on this.
 
v3.3 has added the ability to manage choices with External Text. To set up choices, create a key like you would for normal text. Give it a default option with this tag:


[Default Choice] !Choice!


Set !Choice! to 0 to disable canceling, to a number from 1 through the number of choices that will be provided to have that option
serve as the default, or to the number of choices + 1 (e.g. 5 if there are 4 choices) to give cancel its own branch.
 
Next, we'll add our choices. Just type them! Each new line of text will act as a new choice. These will get wrapped in the choice box, so feel free to make them long! If you want to add manual line breaks in a choice, use the `[Line]` tag. You can have as many choices as you want -- you're not limited to four, like in default Ace.
 
You're done! Go to the Script Calls section to learn how to use your new choices.


Displaying Text

Displaying text is extremely easy. Place this in a Script event command, and you're set:
 
text(!Key!)

Remember those keys that we defined for our text? Well, this is where we use them. Replace !Key! with the key of a section text to display it. You can have as many text(!Key!) calls per Script command as you would like - they will display one after the other.

v1.5 added in the ability to display multiple sections of text with a single call. You can read more about that in the Header of the script or in the next section here, the Sample Text.txt File.
 
v3.0 has added an unsorted version of block_text, as requested -- call it with
 

block_text_us(!KeyPattern!)[code] As with block_text, !KeyPattern! can be a Regular Expression (recommended) or a String. v3.2 adds the ability to override existing keys for a given save file! Use this script call: [code]$game_system.add_override(!Key1!, !Key2!)[/code] `!Key1!` is the key that you want to override.`!Key2!` is the key that contains the value that `!Key1!` should now reference. You can remove overrides with this script call: [code]$game_system.delete_override(!Key!)[/code] `!Key!` is the key whose override you want to delete. You do not need to delete an override before replacing it. If you call add_override for a key that already has an override, the override will be replaced. Overrides are fully compatible with both MultiLang and Database. v3.3 has added the `show_choices` method. Use it in a script call with this format:  [code]show_choices(!Key!)[/code]  !Key! should be an External Text key that you've formatted for choices as described in the previous section. This call will display the choices -- but how do you branch for them? With conditional branches! Just set up branches that will check the value of the designated ChoiceVariable (found in the SES::ExternalText module). If the player chooses the first choice, the result will be 1, the second choice will be 2, and so on. If you set it up to use a branch for cancel, the variable will be equal to the number you gave for said branch. Easy, right? Just put all of your processing in those conditional branches. You're done![/spoiler][b]Sample Text.txt File - this can be used as-is in an empty project if you want to test the script[/b][spoiler][code=auto:0]# Introduction[Key] Intro 1[Face] Actor5, 7[Name] IsabelleSo some foolish heroes are approaching my land, hm? I'll just have to stomp them out![Key] Intro 2[PFace] 0[Name] \p[1]So this is the evil empire of Cliche...[Key] Intro 3[AFace] 4[Name] \n[4]Boss, are you sure we should be here? It's dangerous.[Key] Intro 4[DFace] Ralph[Name] RalphNonsense! Chaaaaaarge!// End Introduction[/code]You would call these with these script calls: [code=auto:0]text("Intro 1")text("Intro 2")text("Intro 3")text("Intro 4")[/code]Version 1.5 introduces block text calls, which allow us to simplify that to this: [code=auto:0]block_text(/Intro \d+/i)[/code]or this [code=auto:0]block_text("Intro")

The first of those will display all text with a key matching the given Regular Expression. The second will display all text including the given string, making it a less accurate option - I would recommend learning the basics of Regular Expressions. They're not hard, and can be incredibly useful. Note that block_text will automatically sort the keys, so even if things are listed out of order in your text file they will display alphabetically in game - though I would recommend that you keep things organized.


Script
It's right over here on GitHub!

Addons:
Database - Allows you to store all of your Database text in external files! Instructions are in the Header.
MultiLang - Adds support for multiple languages! Instructions are in the Header.
Extractor - this is a Demiurge plugin rather than an RM script. Put it in your Demiurge plugins directory as a .rb file, run Demiurge, and load it into your game's plugins list. A new option will be added to the Tools menu -- "Extract Text for External Text". If you select this option, you will be able to automatically extract all of your game's text (from the Database, from Events, from Common Events, from Troops, and even from the Vocab module!) into neatly organized text files that are fully compatible with External Text. If you let it extract from events (map, common, and troop), it will automatically replace the Show Text commands with calls to External Text. It will also change Show Choices commands into External Text-style conditional branches. Everything will be done for you! Make sure to back up your Data folder before running this command, just in case. No problems have been discovered, even with large test projects, but you should always be careful.

Credit and Thanks
  • Enelvon (author)
  • Solistra (tester, giver-of-ideas-for-multiple-faceset-types [without her input, you would just have the [Face] and [DFace] tags. She's the one who convinced me to add in [AFace] and [PFace]. Bow down to her.], catcher of the # class Class commenting error)
  • ♥ SOURCE ♥ (sanity checked v3.0, provided fix in v3.3.4)
  • ♦SOURCE♦ (lovely banner image)

Author's Notes
This script is made available under the terms of the MIT Expat license. View this page for more information.

Non-Combat Menu

$
0
0

Non-Combat Menu 1.03
by mjshi- OK for use in all projects with credit
Get it here! (direct link)

Introduction
My first actual script that isn't an edit or an addon!
Featuring a fully customizable menu for less combat-oriented games. Mystery, exploration, survival-horror, point and click (or walk and press Z, I suppose)... you can configure pretty much anything in this script to suit your non-combat game's needs!
 
Features
Configurable:
- Configure what can be shown on the menu (currently configurable: Item, Save, Load, Exit("shutdown"))
- Configure whether or not to have a gold window, where the window should be, and how wide
- Change what the item menu shows
- Change where the item description box will go
Version history/Planned Updates:
- Configure if you want a status menu or not Done! Updated to 1.0a
- Configure if you want the status to be shown in the menu Done! Updated to 1.01
- Configure height and width based on percentages so it doesn't take up the entire screen
- Change the order in which commands appear Done! Updated to 1.0b

- Added formation commands

- Added support for most quest logs. Updated to 1.03
 
Screens
(Blank project with some mapping for eye candy)
HkzN75R.png

bPOTjWw.png
 
How to Use
Installation: Paste this script above Main, and preferably above other custom scripts as well.


How to add custom scenes/tabs to the menu:

Required Scripting Knowledge: Minimal

I get a lot of requests for these kinds of things, and every "compatibility addon" is pretty much the same. 

Look in the script that you want to add to the Non Combat Menu, and CTRL + F to find a part where it says "Scene_Quest" or "Scene_Achievements" or "Scene_NewWindowThing". That thing after the _ is going to be referred to hereafter as SCENE. Just replace SCENE with whatever NewWindowThing you found.


Then, add to the menu list:

['Custom Scene', :SCENE],

Then add a general compatibility script under the Non Combat Menu script:

class Scene_End
  def command_SCENE
    SceneManager.call(Scene_SCENE)
  end
end

This method works for 99% of scripts.


Demo
Not really necessary.
 
Scripts
Direct Link: http://pastebin.com/wvbrcAS9

Addons:

Single Item Tab- Skip the item/key item/weapon/armor selection and go straight to the item list. Ideal for projects that only have one tab.
 
FAQ
Q: I don't know how to install the script >.<
A: Open scripts, click on the empty slot above Main, press Insert. Then read the How to Use section again.

Q: I have a question about how to use the script?
A: Read the "Configuration" part in the script. If you still have questions, ask here.

Q: I want to do something with this but am not sure how to do it?
A: Ask away.

Credit
mjshi

Custom EXP Curves

$
0
0

Custom EXP Curves

-Tsukihime

Define custom exp curves using your own formula.

Can be set for actors or classes.

Actors take precedence if both are defined.

Usage

Add the tag


<exp-curve: your_formula>

<exp-curve: level*200>

Only the `level` variable is valid

You can print out the curves by making the script call.


$game_actors.print_exp_table

to create a file called "exp.csv" in your project folder for each actor

Download

http://db.tt/BQ2cHomP

Plugin 3.2

$
0
0

udf2v8h.png


Requeriment: Dax Core

Version: 3.2

Download: Here

This script will permit that you can add 'plugins' at your project and update
them directly of your project.


Quoting from tiagoms about the use of the plugin:

Quote

This script is a resource valuable to creation of projects in groups.


For example:

- 5 developers are part of the one project.

- Each developer has a project with this script.

- Each developer has a single record in this script (total, 5 registers) .

- When one of the developers finish an topic (example: a picture), he'll upload this picture for a servidor.

- After upload to a servidor, he'll update the content of the link (register)

- Done this, all the four developers will receive automatically(s) file(s)


Fantastic!


Viewing all 416 articles
Browse latest View live


<script src="https://jsc.adskeeper.com/r/s/rssing.com.1596347.js" async> </script>